Organization Management
In Nanitor, an 'organization' typically corresponds to a company and includes users, assets, and all pertinent information such as inventory and security details. The structure facilitates efficient management of the IT infrastructure and assets, offering a comprehensive view and control over security issues. Users within an organization are usually from the security and IT divisions. They are charged with overseeing security and managing devices respectively. This model streamlines the task of maintaining a robust security posture within the company.
Each Nanitor instance can keep multiple organizations. That allows users to switch between organizations without the need to log out and log into another Nanitor instance. A user with a system administrator role or access to several organizations can switch between organizations after login or at any point during their work with Nanitor. To switch between the organizations, the user needs to click their profile icon at the top right and then click Switch organization.

When you are an administrator for the organization you are accessing, you can access the Organization management section from the cog wheel on the top right.

Organization Management
This section is where you can manage the settings that are specific to the organization that you are currently viewing.

Organization & users
This section includes the following settings:
-
General organization settings: They include organization slug and name, log server settings, the vulnerabilities checking option (either the vulnerabilities checks are enabled or disabled), and automatic Agent upgrades setting. For suborganizations, the Enable vulnerability checking and management and Enable automatic agent upgrade options are inherited from the parent organization and cannot be changed.
Benchmark upgrade behavior: Two settings under this heading control how benchmark upgrades affect your baselines:
- Automatically add new rules to baseline (default: OFF) — When a benchmark is upgraded to a newer version, new rules may be introduced. When OFF, these new rules are held out of the baseline until an administrator explicitly applies them.
- Automatically apply severity and baseline changes (default: OFF) — When a benchmark is upgraded, severity ratings and baseline recommendations for existing rules may change. When OFF, these changes are held at their current values until an administrator explicitly applies them.
Rule content, checks, and remediation guidance are always updated to the latest version regardless of these settings.
For suborganizations that use the parent baseline, these settings are inherited from the parent organization and cannot be changed independently. See the Benchmark Changelog for details on recent benchmark updates. * Health score: This section displays the current organization's health score and allows managing its target health score. * Session security: If the Allow only one session per user option is selected, users will be automatically logged out once they log in elsewhere. This is a recommended setting to enhance general system security. * Users: This section allows viewing and managing users and SAML permissions. You can invite new users to your organization by specifying their email addresses and roles. * API keys: This section shows already generated API keys and allows generating new API keys. * Integrations: Here you can preview and manage third-party applications integrated with Nanitor, for example, JIRA.
Assets & collectors
The following options are available:
- Asset discovery: The Network discovery group of settings allows managing automatic network discovery and port probing. The Active Directory discovery group of settings allows enabling automatic asset and user discovery in Active Directory. When the Active Directory user discovery is enabled, it will run automatically every 6 hours or when you click the corresponding link in this options group.
- Asset archival: This group allows defining the rules for asset archival in your organization. The rules can be defined for assets of a certain type or with a certain label. For each asset type/label, you can define the number of days of inactivity after which an asset is automatically archived. If several rules can be applied to an asset, then the rule with the highest priority (the first matching rule in the rule list) is applied. If no rule applies to an asset, then after 7 days of inactivity, the asset will get the Pending archival confirmation status and will require a manual confirmation before being archived. For more information, see Knowledgebase - Nanitor archival policy.
- Labels and labeling rules: These options allow managing labels and defining rules for automatic label assignment. Suborganizations inherit labels and labeling rules from their parent organizations and can add their own, if necessary. See Labels and Labeling Rules for more details.
- Custom Software Checks: This section allows you to define custom checks for specific processes, files, or directories that may not appear in standard operating system software inventories.
- Custom Software Checks help detect portable, rogue, or legacy software by looking for specific file paths, directory patterns, or running processes.
- When matches are found, they appear in the Software Inventory with a "Custom Software Check" source tag.
- You can configure checks to run on all assets, specific asset types, or assets with particular labels.
- All actions related to Custom Software Checks (creation, updates, enabling/disabling, deletion) are logged in the Activity Log for audit compliance.
- For more information, see Custom Software Checks.
- Collectors: This section lists the installed collectors and allows you to add new collected assets and credentials, nominate an asset to become a collector, or simply view the status of your collected assets and manually check them in.
- Agent installers: From this section, you can download all the available agent and standalone collector packages for monitoring assets. The downloaded installers can be installed directly on your assets or with a software distribution tool like SCCM.
Asset policy
The following options are available:
- Issue configuration: This section allows you to configure the issue creation behavior for device issues, software issues, identity issues, and open ports. You can also specify the issue type priority scaling factor and configure the issue priority age scaling factor.
- Compliance settings: This section allows selecting compliance frameworks and setting a primary compliance framework.
- Benchmark settings: These settings allow viewing and configuring benchmarks for the organization and setting their priorities.
- PII settings: This section allows enabling PII search for credit card numbers, USA social security numbers, UK national insurance numbers, and email addresses. Once the PII functionality is enabled, the Nanitor agents will look for possible matches and report any findings. Nanitor will create an issue for all findings of the PII issue type.
- PII ignore: This section allows defining ignore patterns and paths to deal with false positives that come up in PII.
- External attack surface: This section allows enabling and configuring the external attack surface management (EASM) feature. EASM leverages Shodan to discover and analyze the external attack surfaces, including IPs, domains, and services. This feature identifies external assets that are related to a specific set of defined domains. It is highly recommended to always have external scanning enabled.
AI settings
Organization administrators can enable or disable AI-powered features (Remediation Insights and Root Cause Analysis) for their organization. This toggle is only available when AI features are enabled at the system level. For details on what data AI features share, see AI Data Handling and Privacy.
Email notifications
Here you can specify recipients and the frequency of the scheduled health report.
Alerts
This section allows you to create rules that define conditions that will trigger an alert to be sent out through email or a Slack channel. For example, you can be alerted when a new, highly rated vulnerability has been detected or when the scope of one of your remediation projects has been changed. Alert rules are helpful to be notified of important events in Nanitor without having to manually check for them.
License and product information
In this section, you can view information on the Nanitor license for this instance, including identifiers, created date, allowed assets, trial license status, and expiration date. You can also enter a new license key to update the license. You can view information about the Nanitor version installed on the server.
User management
User management within an organization in Nanitor involves inviting users, configuring their authentication, and defining their roles. This allows you to maintain control over who has access to your organization's data, if there are any scope limitations for them (based on labels) and what actions they can perform. When adding users to the parent organization, you can define their role as inheritable. In this case, the user will have this role in all suborganizations.
New users are invited to the organization by email. For step-by-step guidance see our help article: - How do I create a new user in my organization?
Configuring authentication
User authentication in Nanitor is managed by the system. When a new user is invited to join an organization, they receive an email invitation with a link. By clicking on this link, they are directed to a page where they can set their password and configure MFA if required. This process ensures that only authorized individuals have access to your organization's data and infrastructure. Users can also reset their passwords or MFA settings from their account settings page.
Nanitor supports robust authentication methods to ensure the security of your organization's data. The system supports password-based authentication, and it can be configured to require MFA for an additional layer of security. MFA methods supported include authenticator apps and hardware tokens.
Please note that the system's authentication settings apply to all users in the organization. It's critical to enforce strong authentication practices to protect your organization's data and infrastructure.
See more about authentication in Authentication options.
Technical policy
The Technical Policy is a cornerstone within an organization in Nanitor. It not only sets the security configuration baselines for your IT assets but also dictates how issues are configured and managed within your organization.
Configuration Baselines
The configuration baselines are developed based on Nanitor-provided industry best practices, regulatory compliance requirements, and your business-specific guidelines. These baseline configurations represent the approved standards and protocols that your IT assets should adhere to. In Nanitor, continuous monitoring of asset compliance is conducted against these baselines, alerting you promptly when settings change, and your assets are not in compliance.
Related help articles:
Issue Management
Within each organization, specific settings can be configured for different types of issues. For example, you can set whether an issue is part of the baseline, its severity, and the action to be taken. This applies to various categories of issues such as device issues, software issues, user issues, and port issues.
For instance, device issues could range from 'Rogue device discovered on network' to 'Disallowed port(s) open on device'. Software issues can be set to 'Soft' (issues only created on blacklisted items) or 'Detailed' (require whitelisting all software, issues created on anything not whitelisted). Similarly, settings can be defined for user issues and port issues.
Labels and Labeling Rules
Labels are a powerful way to organize and categorize your assets in Nanitor. You can create labels to group assets by location, function, department, or any other criteria meaningful to your organization. Labels can also be used to set asset priority ratings, which affect how issues are prioritized.
Creating Labeling Rules
Labeling rules allow you to automatically assign labels to assets based on conditions. To create a labeling rule:
- Navigate to Organization Management → Labels and labeling rules
- Click Create rule
- Define the conditions that assets must match
- Select the labels to apply when conditions are met
- Optionally, make the rule inheritable to suborganizations
Condition Logic: AND and OR
Labeling rules support flexible condition logic:
- AND logic between condition groups: Different types of conditions (e.g., Platform AND Hostname) are evaluated together. An asset must match ALL condition groups to receive the label.
- OR logic within condition groups: Multiple values of the same condition type are evaluated with OR logic. For example, "Platform is CentOS OR Linux OR Ubuntu" means the asset can match any of these platforms.
This allows you to create powerful rules like: "Apply label 'Linux Servers' if Platform is (CentOS OR Ubuntu OR RedHat) AND Type is (Server OR Cloud)"
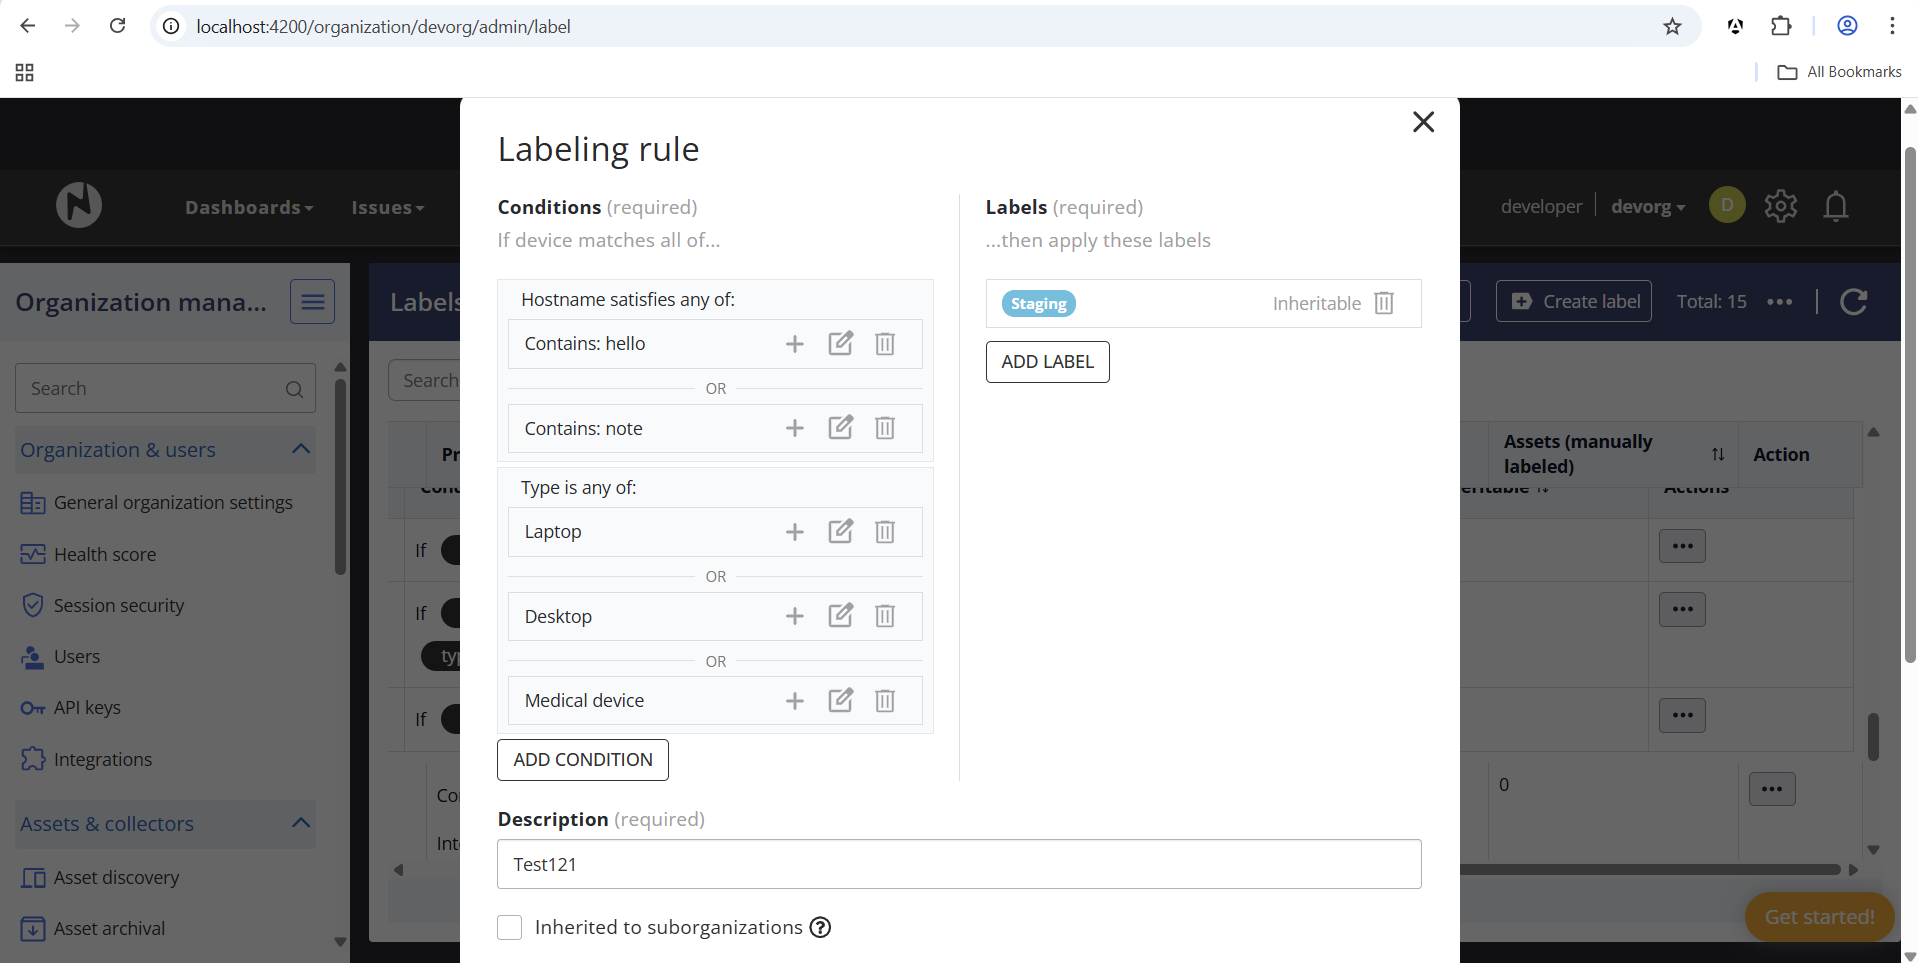
Adding Multiple Values to a Condition
To add multiple values (OR logic) within a single condition:
- Click the + button next to an existing condition value
- Enter the additional value
- Repeat to add more values as needed
Each value within the same condition type is connected with OR, meaning assets matching any of the values will satisfy that condition group.
Viewing Rules in the Labels List
The Labels and labeling rules page shows all labels and their associated rules. Rules display their conditions using clear visual formatting:
- Multiple values in the same condition group are shown with "or" between them
- Different condition groups are connected with "and"

Custom Field Conditions
Labeling rules can also use custom fields as conditions. This includes:
- Text custom fields: Match based on text patterns (contains, starts with, etc.)
- Checkbox custom fields: Match based on the checked or unchecked state of a checkbox field
To use a checkbox custom field in a rule, select "Custom field is checked/unchecked" as the condition type, choose the checkbox field, and specify whether to match when it is "Checked" or "Unchecked".
Inheritable Rules
When creating a labeling rule, you can mark it as "Inherited to suborganizations". This means the rule will automatically apply to all child organizations, ensuring consistent labeling across your organization hierarchy.
Common use cases
Frequent use cases related to organization management include:
- Inviting users to join my organization
- Adding application benchmarks to an organization
- Enabling SAML authentication for my organization
- Configuring 2FA for signing into my account
- Downloading agents to deploy on assets
- Adding collected devices
- Enabling PII search for credit cards
- Defining asset labels
- Assigning asset labels automatically based on specified conditions
- Priority rating assets: We recommend doing this on a per-label basis, i.e. going to the Labels settings and assigning a default Asset Priority assignment for each label.