Quickstart
Install data sources
All information gathered by Nanitor is retrieved from assets connected to your Nanitor instance. Therefore it is essential to connect your asset fleet to Nanitor. There are two ways to do so:
-
Installing an agent on end devices like laptops or workstations or on Windows or Linux servers. The installed agent publishes (push approach) all gathered information from the asset to the Nanitor instance. The agent runs as a service on the asset and reports all changes to Nanitor regularly. Changes made on the asset should be visible in Nanitor within a couple of hours but can also be manually forced from within the UI if applied changes need to be reviewed within a shorter period. The installed agent needs to be able to communicate with the Nanitor server.
-
Connecting to network devices or other assets that do not allow the installation of an agent such as databases, Cloud environment, or container images. To be able to connect to those assets you will need to have a collector installed. A collector can either be installed on a Debian, CentOS, or RedHat server or you can decide on an installed agent to act as a collector. You could also work with both approaches simultaneously to overcome challenges with assets inside isolated networks.
Installing agents
Installing an agent on your machine is easy. Simply download the proper agent for your platform, for example, Windows or MacOS, and install it. The asset immediately populates the basic information into the Nanitor asset inventory and the rest of the full initial scan results should be available within 5-10 minutes.
The agent can be downloaded by administrators from the download section by navigating to Administration -> Organization Management -> Downloads.
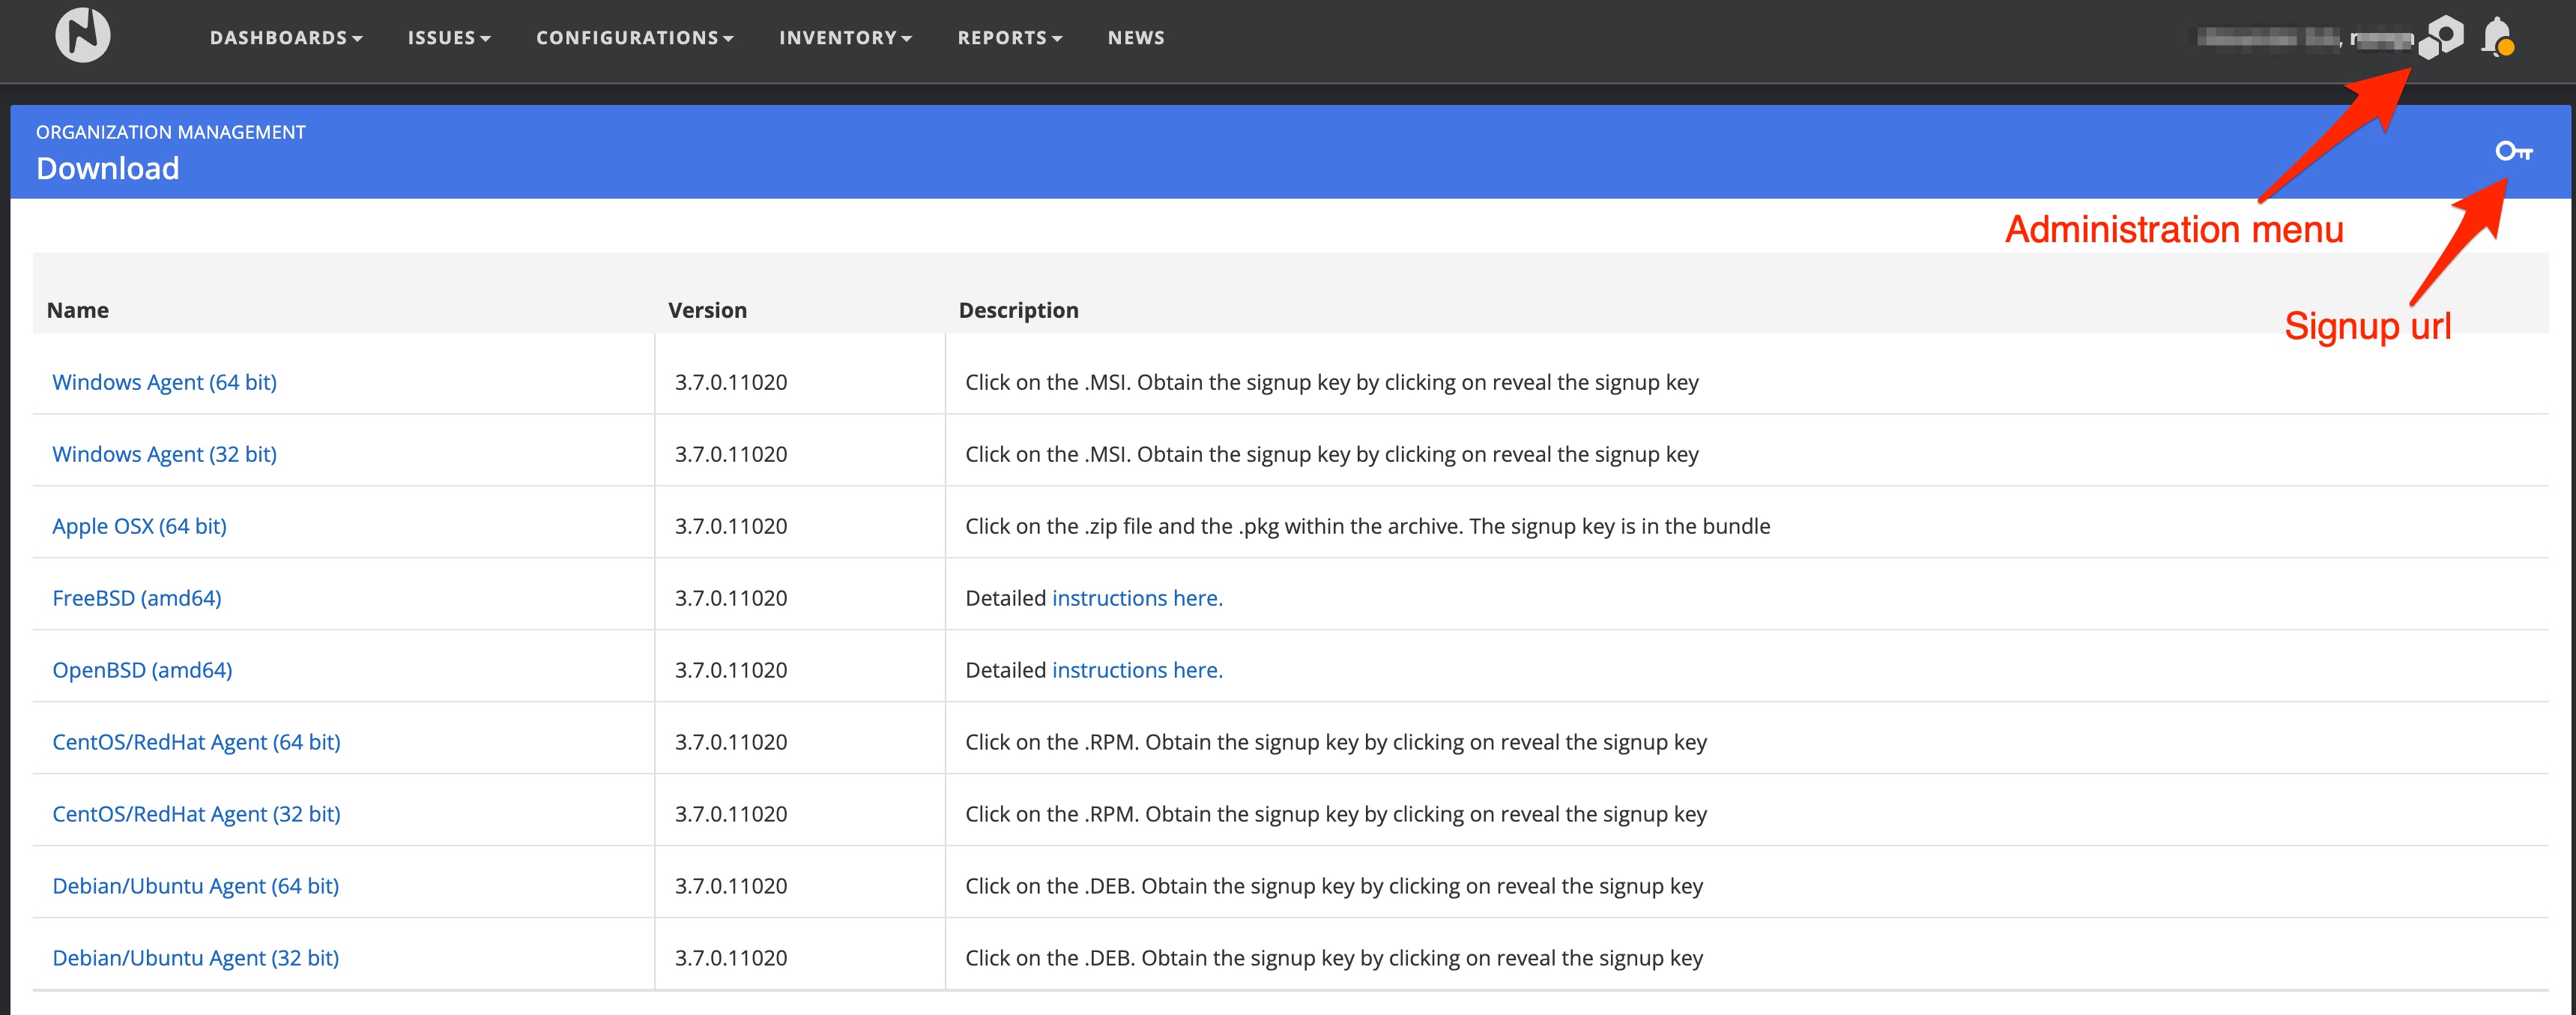
Nanitor supports various platforms where the agent can be installed on. Installation instructions can be found in the downloaded package for each distribution. During the installation process, you will be asked to enter a signup URL that is used by the Nanitor agent to authenticate against your Nanitor instance. The signup URL is included in the download package or can be revealed from the key icon on the top right of the page.
If you want more detailed information on what footprint the agent leaves behind, on which platform you can install the agent, how you can leverage distribution tools like SCCM or similar to roll out the agents quickly to your organization's endpoints or troubleshoot any issues that might arise during installation, the upgrade process or usage you should head to the knowledge base for further details.
Installing collector(s)
Collectors collect information from other assets. The collector can be installed as an independent Linux server or you can leverage an installed agent to act as a collector. Once the setup of a collector has been completed, the collection of data from other devices can then be configured through Nanitor. On each device that you need to collect information from you will need user credentials (username and password to be able to log into the device per ssh or telnet). It is recommended to create Nanitor-specific users on each device (can be done per type) that the collector leverages to log into the device. You need to consider platform-specific configurations and privileges needed.
Note
The collector needs to be able to communicate with the assets that you decide to collect information from.
All installed, and available collectors can be viewed by Nanitor administrators from Organization → Collectors within the administration settings page. The collector section keeps information on user credentials used to log in and collect information from connected assets and the assets themselves.
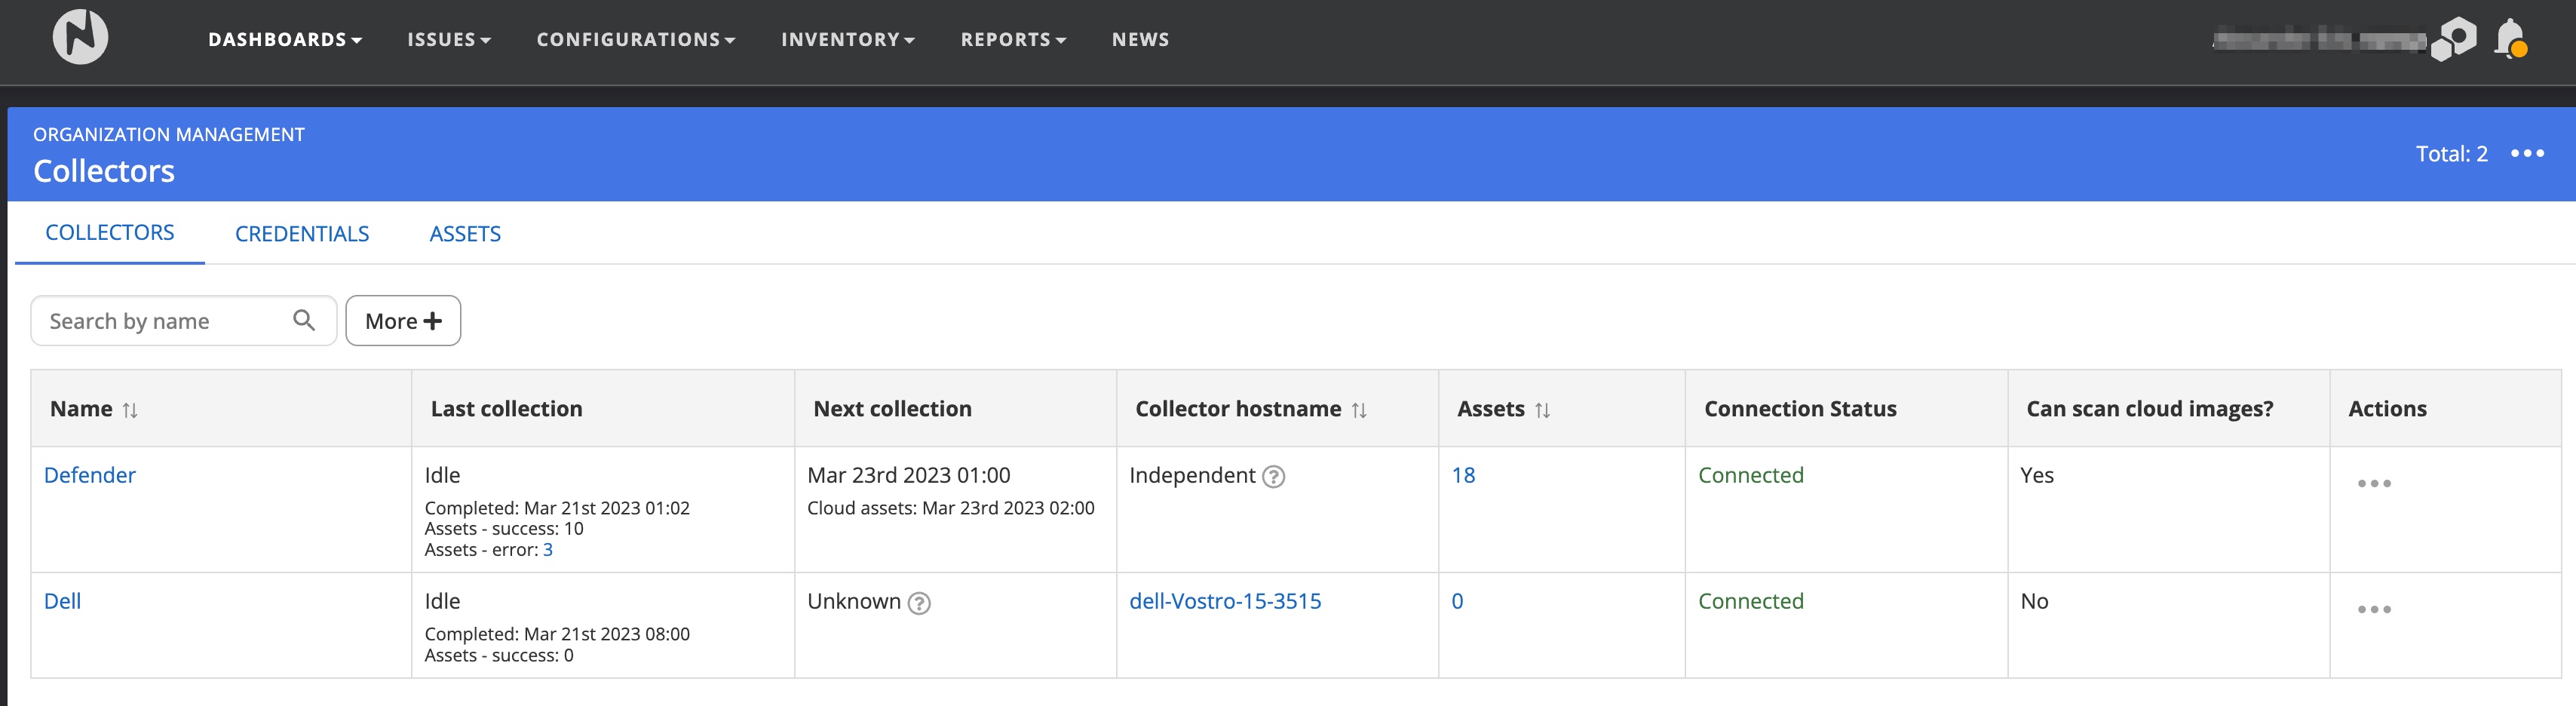
Since the collector is using a different approach to pull information from the assets instead of getting the information delivered from the agent you will also need to create login credentials for a user with sufficient but limited rights and you will need to have all information at hand like the IP address of the asset and the port that the asset is communicating with.
Further information on the collector, the setup procedure, using it, and configuring it to collect information from other assets can be found in the knowledge base.
Asset prioritization
Your assets will appear in Nanitor after the installation of the clients. Before Nanitor can provide you with insightful and weighted results you will need to prioritize your assets. Prioritizing assets is done by tagging your assets with labels or as a failover an asset gets priority from its assigned CIS benchmark (see below). You should do a C-I-A (confidentiality, integrity, and availability) rating per label and assign one or more labels to your asset fleet. Labels are also used for reporting purposes. If that sounds complicated or confusing you can get guidance in our best practices labeling guide.
Benchmarks
Benchmarks have their origin in the Center for Internet security or CIS. CIS is a non-profit organization that issues security guidelines to secure the IT infrastructure for organizations all over the world. These security guidelines are called benchmarks and are published for various operating systems, databases, applications, Cloud infrastructure platforms, and mobile devices. A complete list of supported systems can be found on the CIS website. An understanding of CIS benchmarks is essential since it is the core of Nanitor and a well-configured asset is fundamental for a secure IT landscape. For more background information on CIS benchmarks you can read our CIS basics guideline. Nanitor will compare your assets against one or more benchmarks and provides a score compared to the CIS benchmark.
Each benchmark consists of several hundred pages containing configuration requirements (benchmark rule or benchmark control). All requirements have:
- An explanation of why the requirement is set. It is somehow listing the possible risks attached to this benchmark (Rationale)
- Guideline on how to check that the configuration setting exists (Audit)
- Guideline on how to fix the misconfiguration issue (Remediation)
- The level (Profile Applicability) of where it applies (Level 1, Level 2, or Level 3). The higher the level the more detailed the configuration issue is. By default, Nanitor applies Profile level 1 when more than 1 Profile level is defined in the CIS benchmark.
- The CIS control version the configuration requirement refers to. In CIS control versions lower than Version 8 these are called sub-controls and from Version 8 onwards they are called safeguards
- Optional if applies: The impact remediation could cause
- Optional if applies: A link that provides more detailed information
Compare your results
Nanitor is detecting automatically for you what CIS benchmark Nanitor is comparing your assets against. Each benchmark is getting a score. The calculated benchmark score is a ratio of passed benchmark controls and the total amount of checks Nanitor is performing. The score for your IT infrastructure can be accessed by navigating to Configurations -> Security configurations.
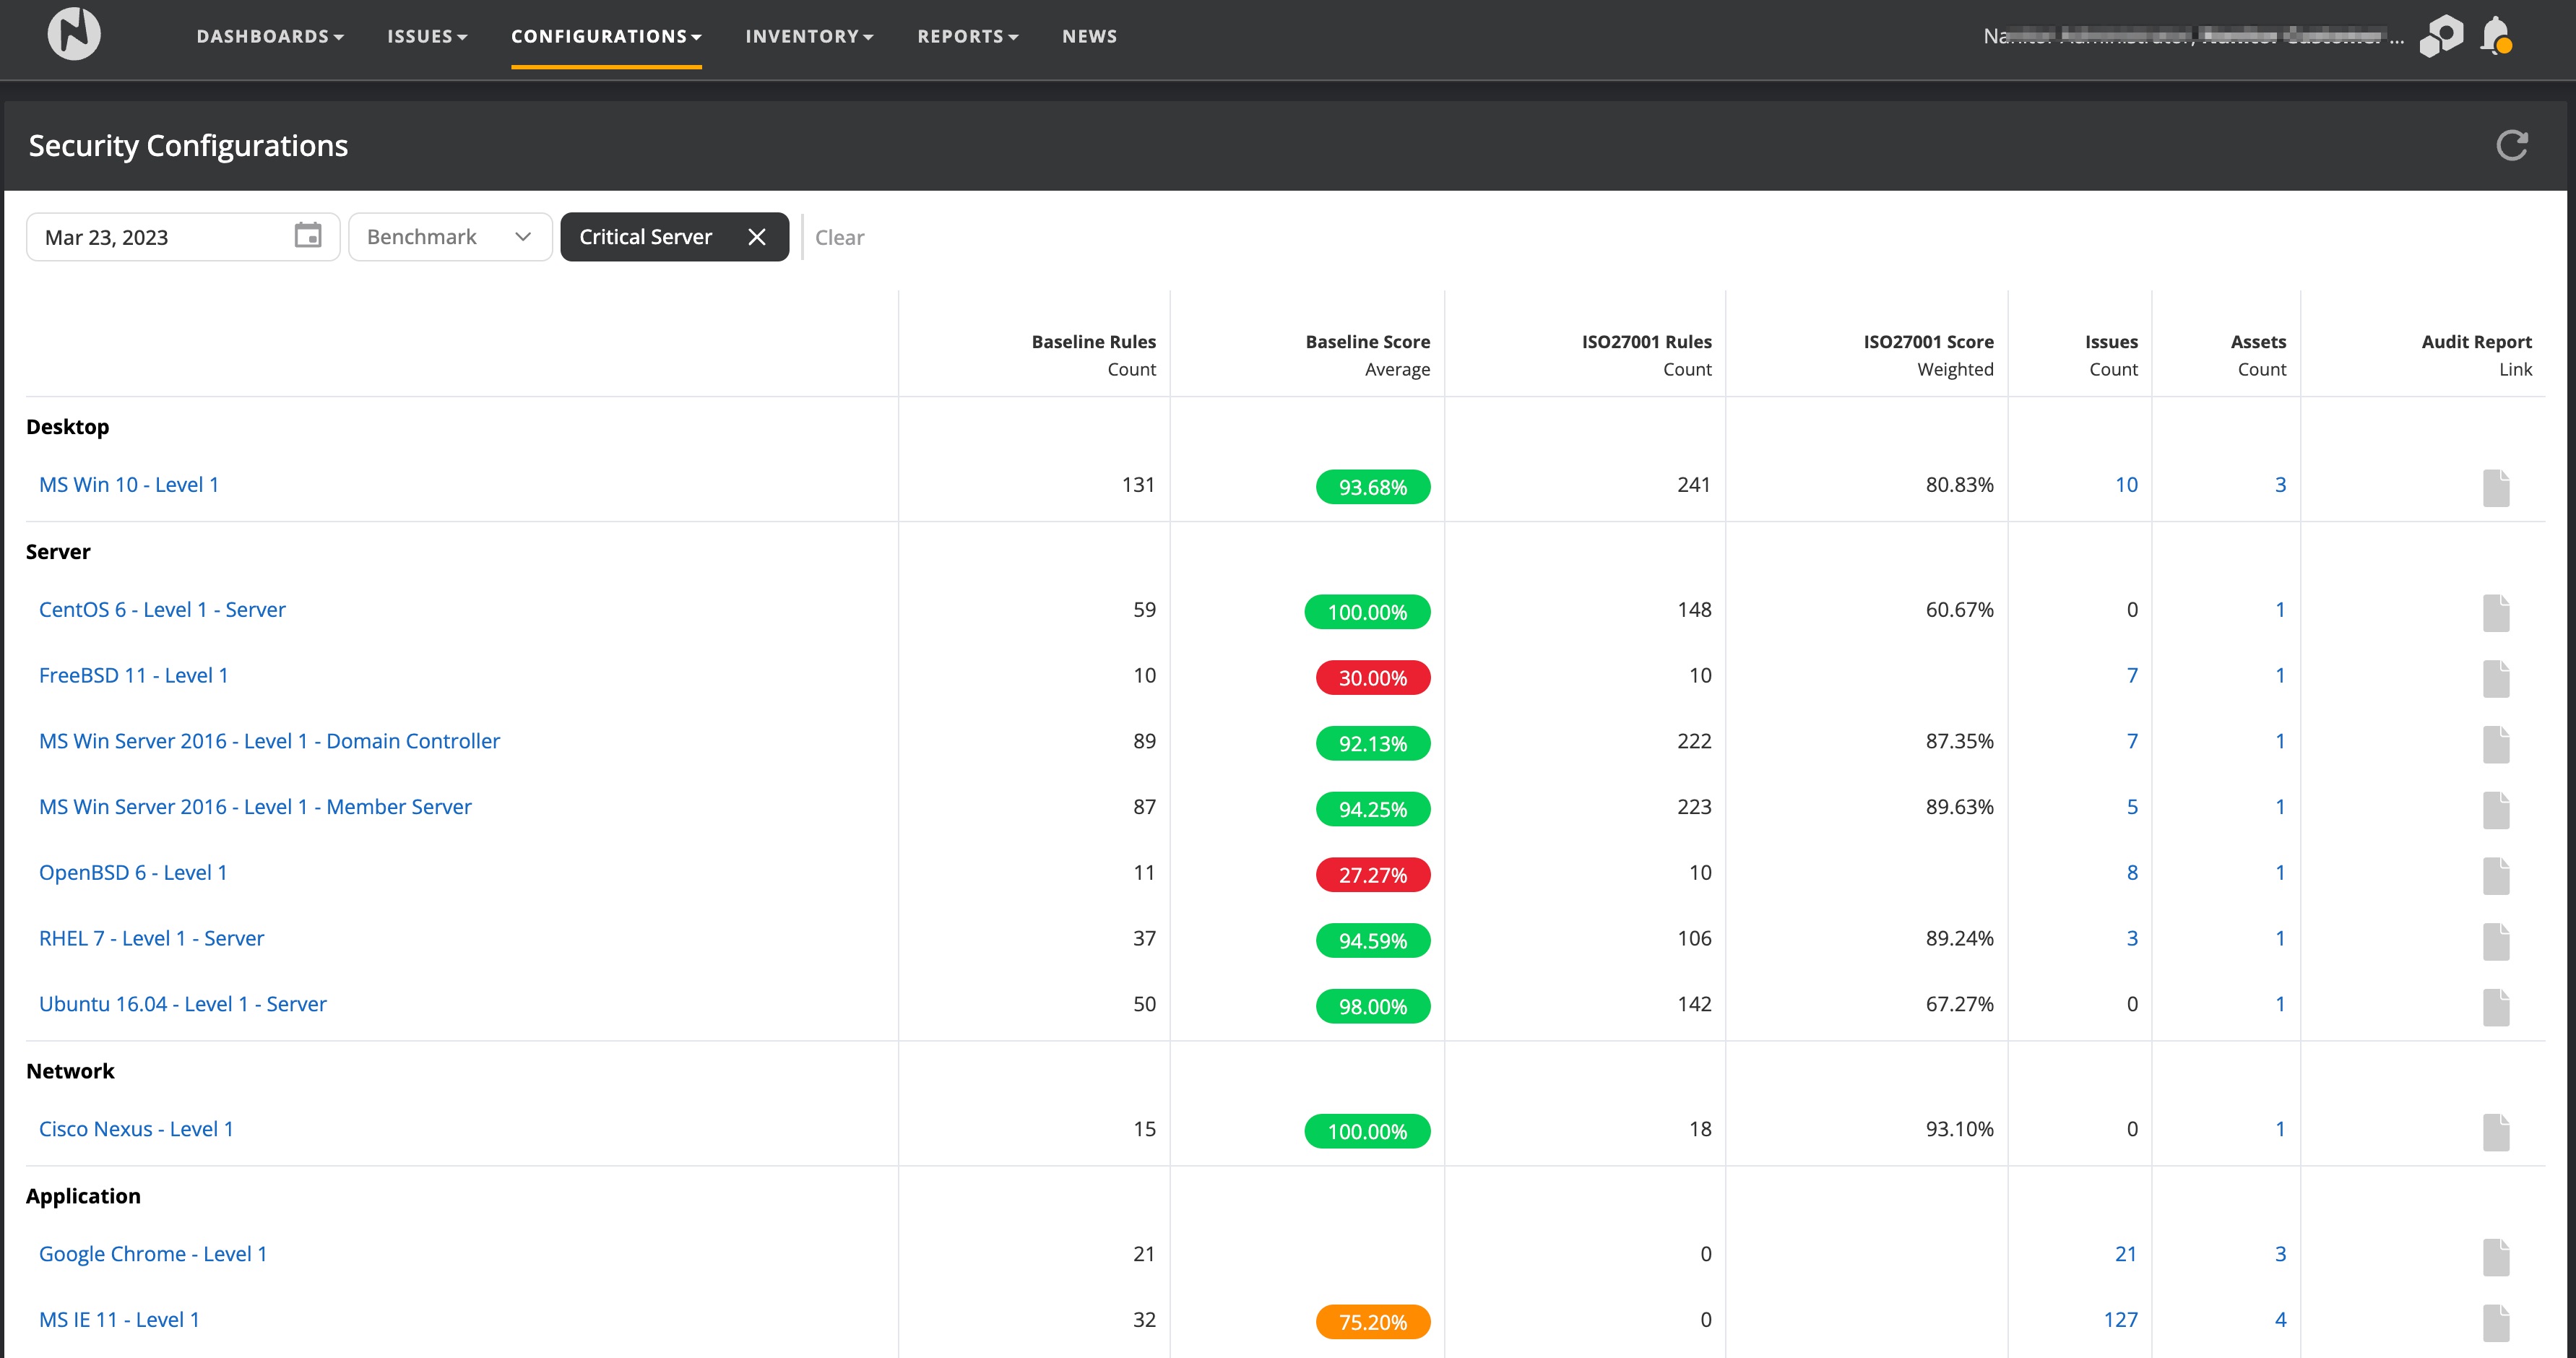
The results on this page can be filtered by a specific CIS benchmark or asset label/s. On the top of the page. Each benchmark has a set of benchmark rules that Nanitor is checking against. In Nanitor the benchmark rules are split into those that are included in the scoring result and those that are excluded in the scoring result. Benchmark rules included in the scoring result are called the benchmark rules in baseline and that is the actual result you get presented on the security configuration page. Benchmark rules can be added to be included in the baseline score and can be removed to be excluded from the baseline score. The benchmark rule set that Nanitor is checking against the need to be adjusted according to your technical policies. Some benchmark rules require comparison against a threshold value (eg password length) which can be set in Nanitor on some occasions. Additionally, Nanitor gives the best estimation of the score of the benchmark according to your primary compliance target (such as ISO27001, CIS framework 8, NIST 800, or PCI-DSS). Benchmarks issued by CIS include checks that are rated according to their relevance for your IT infrastructure. The relevance of a benchmark rule is divided into levels 1,2, or 3. The higher the level the more difficult it is to comply with the benchmark rule. By default Nanitor is only checking against the level 1 benchmark rule set but supports other level sets for certain benchmarks.
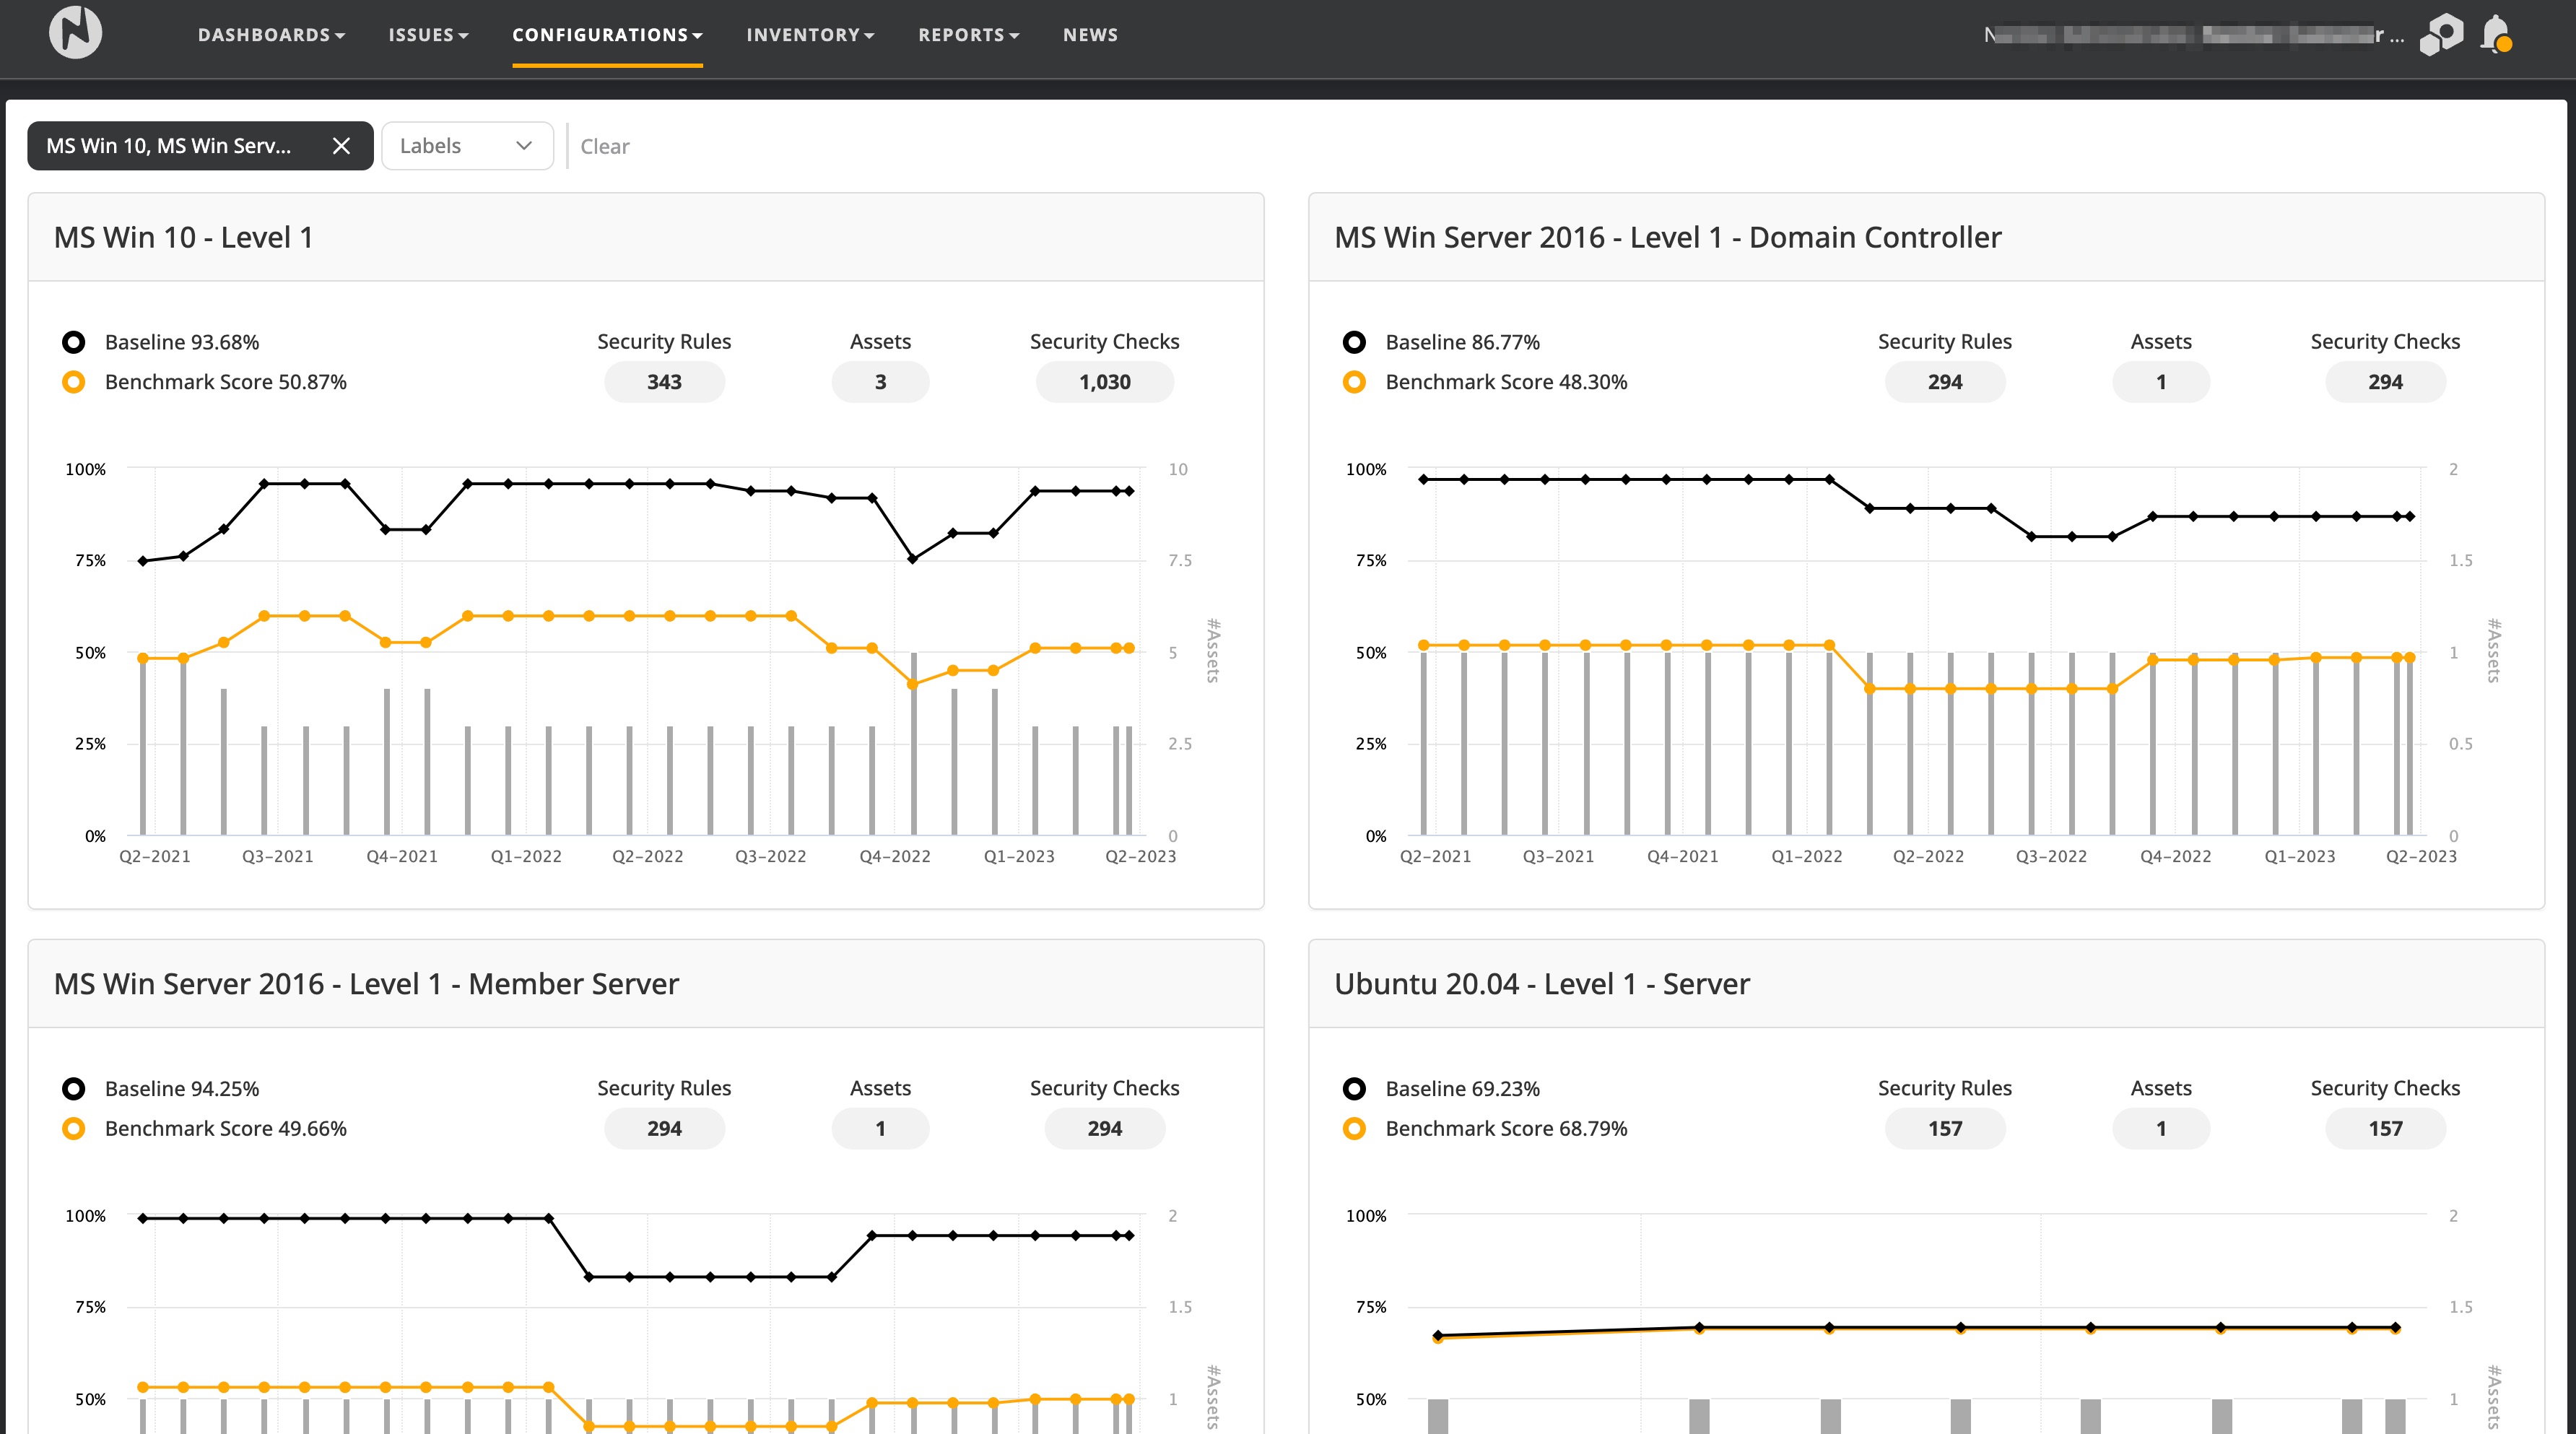
The scores are stored historically which allows you to compare a result back in time. Viewing the trends of the benchmark score gives you insights into the progress that has been made regarding hardening your assets. The trend report is accessible from the Configurations -> Configuration trends.
A failed benchmark rule on one or more assets will be flagged as misconfiguration issue in Nanitor.
Prioritizing order
On a clean install, every available benchmark will assign a default priority rating of 5 in each category (Confidentiality, Integrity, and Availability) to assets with that benchmark assigned. This default is intended to be overridden, whether on benchmark, label, or asset level.
Priorities can be set at three different levels:
Asset priorities override values can be set for an individual asset, in which case they will override all other applicable priority assignments for that asset. This method should be applied on rare occasions for assets that do not fit against the priority rating on an applied label or the benchmark of the asset. An individual asset priority can be set within the asset overview.
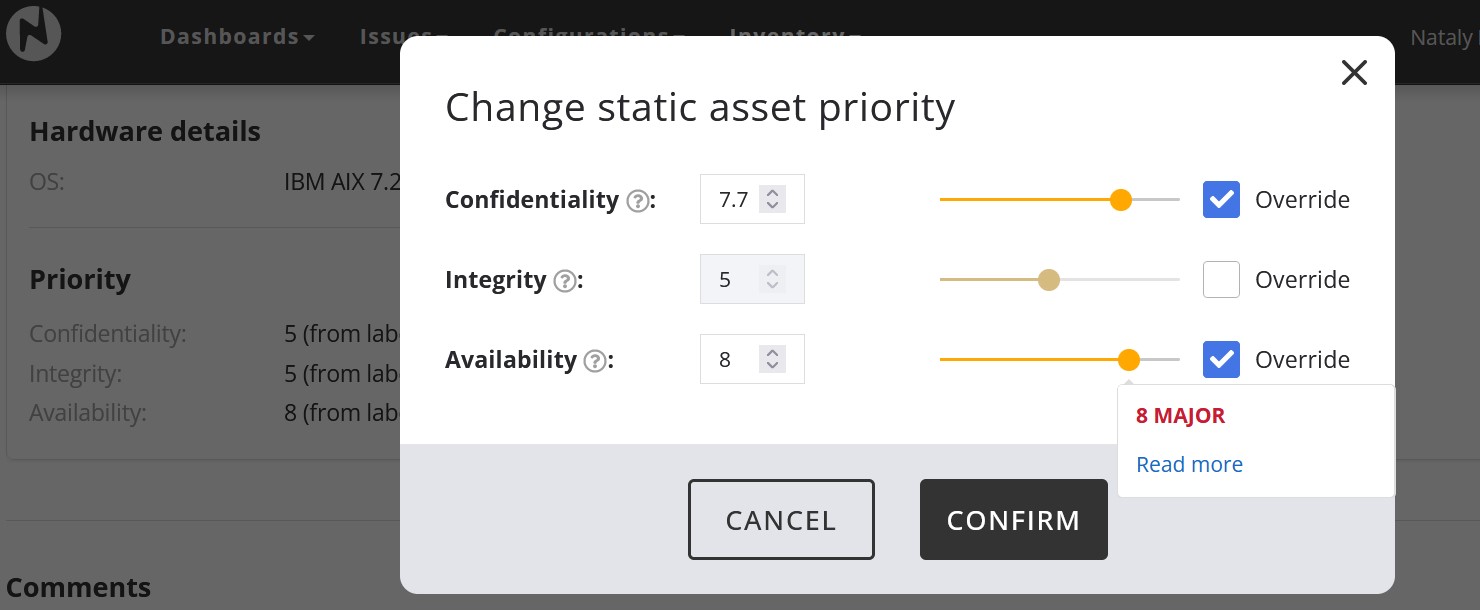
When clicking the edit button you will be presented with the asset priority score window where you can both adjust the asset priority rating and get information on how the asset priority has been applied. Nanitor increases the asset priority dynamically in various scenarios where eg the asset is on the same network with other assets that have a higher rating. What Nanitor exactly has been applied can be read from the information icon on each asset priority.
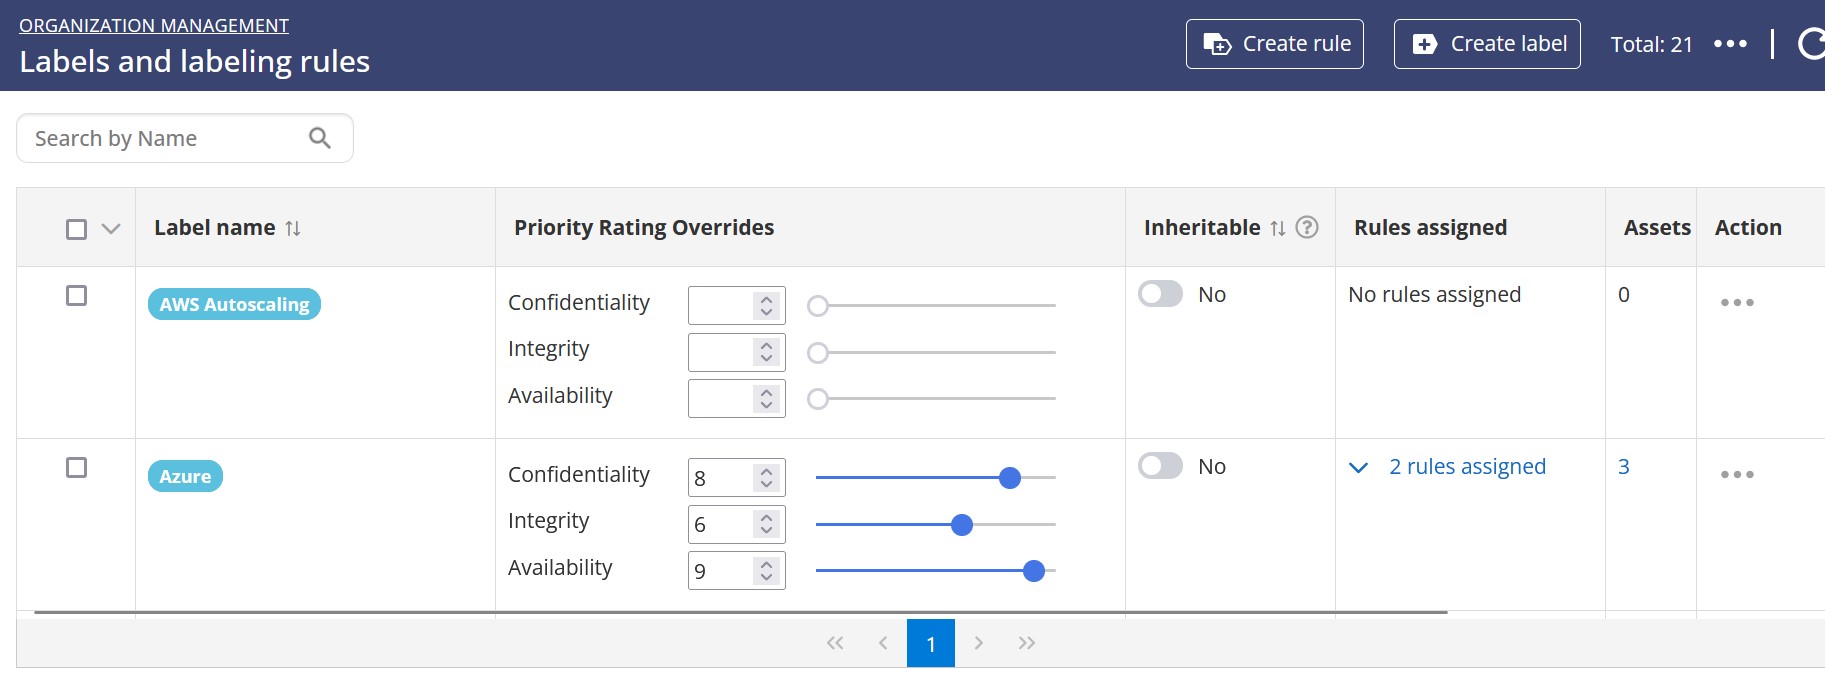
Label priorities are the most efficient way to assign priorities by assigning them to labels and then assigning labels to assets. If a label has priority ratings, it will override the benchmark’s priorities. When an asset has multiple labels, the highest of the labels' priorities will be assigned to it. Navigate to the "Labels" menu from the administration menu to set a priority on your labels.
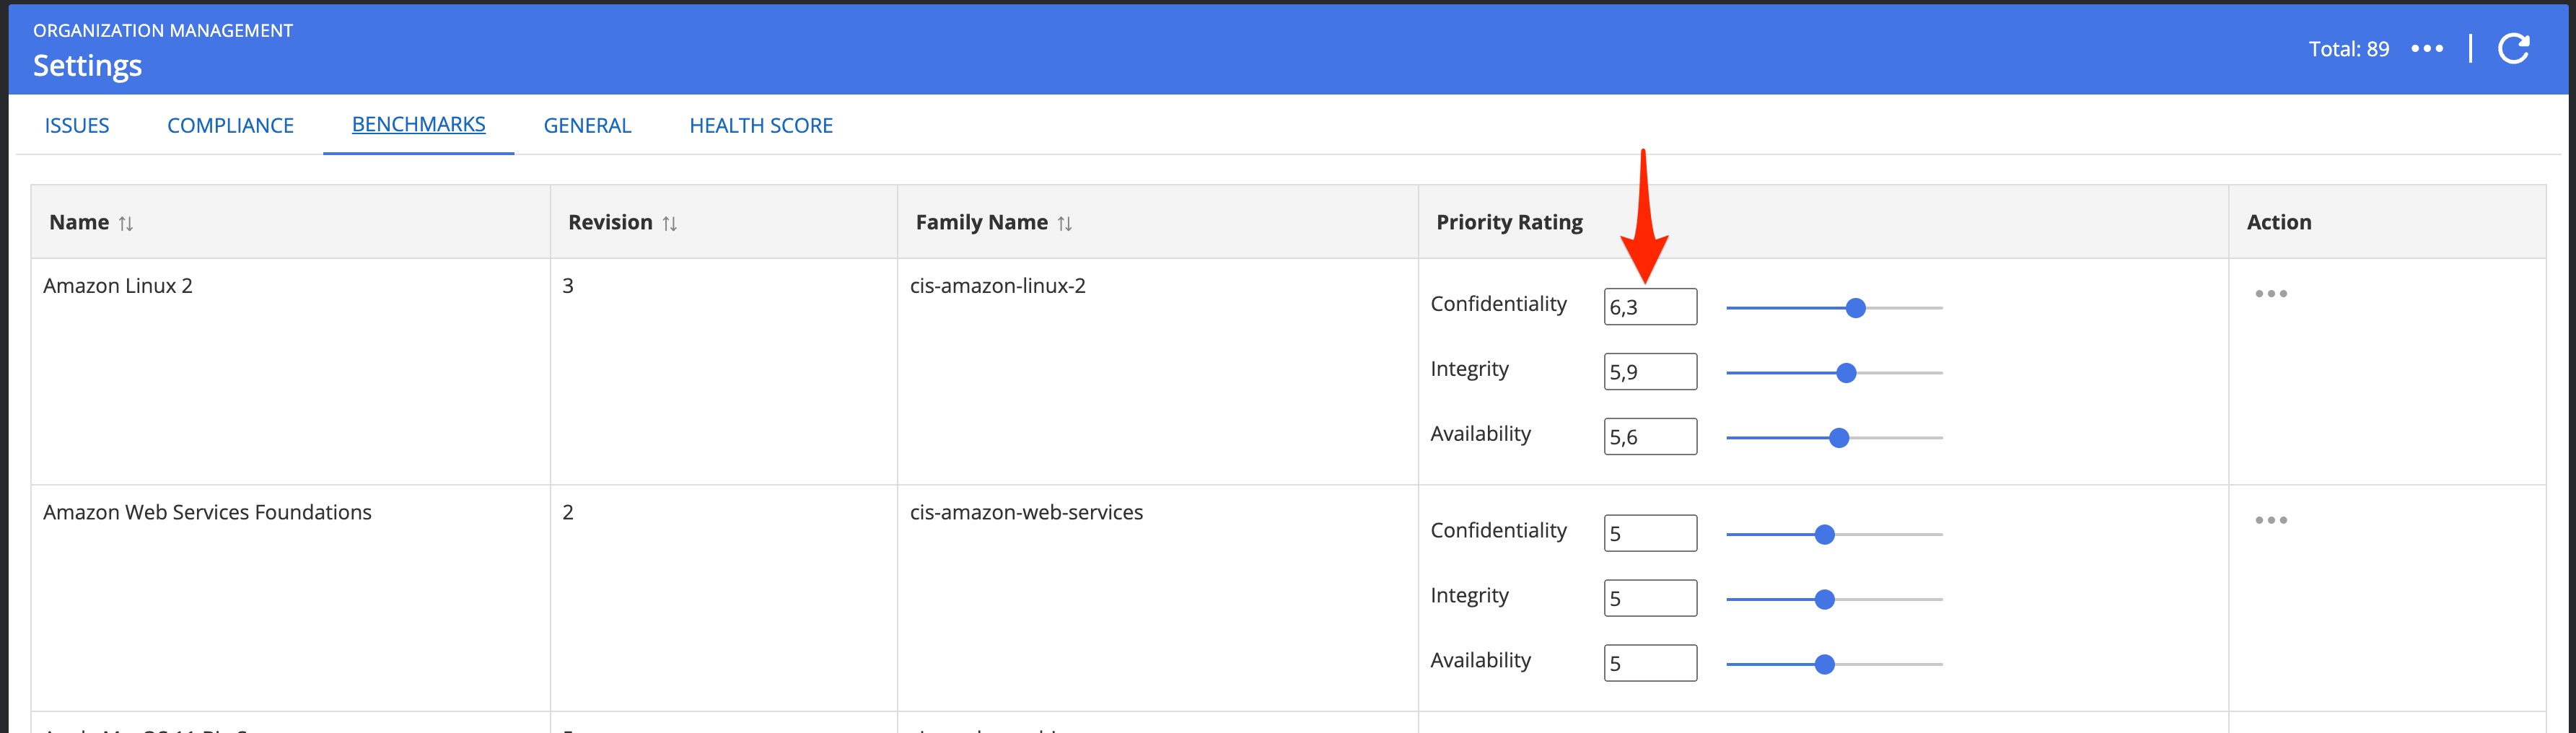
Benchmark priorities: If the default priorities for particular benchmarks have been changed for the organization, then any assets with those benchmarks assigned and no overriding label or asset priorities will receive the benchmark’s default priorities (5/5/5). The priority rating for benchmarks can be set from the settings window under Administration -> Organizations -> Settings and then heading to the benchmarks tab.
Sneak preview
The results are in
Now that you have completed the installation and rated your assets you can take a sneak preview of the results presented in the Nanitor diamond. Nanitor is prioritizing detected issues in your IT environment so can focus on what has the most impact on your IT security. To understand better what issues are exactly and how Nanitor is calculating its score you should read the 101 on Nanitor issues to get familiar with issue priority and the Nanitor prioritization score. Detected issues from installed agents and collected assets can be viewed from the issue diamond view (Issues -> Diamond).
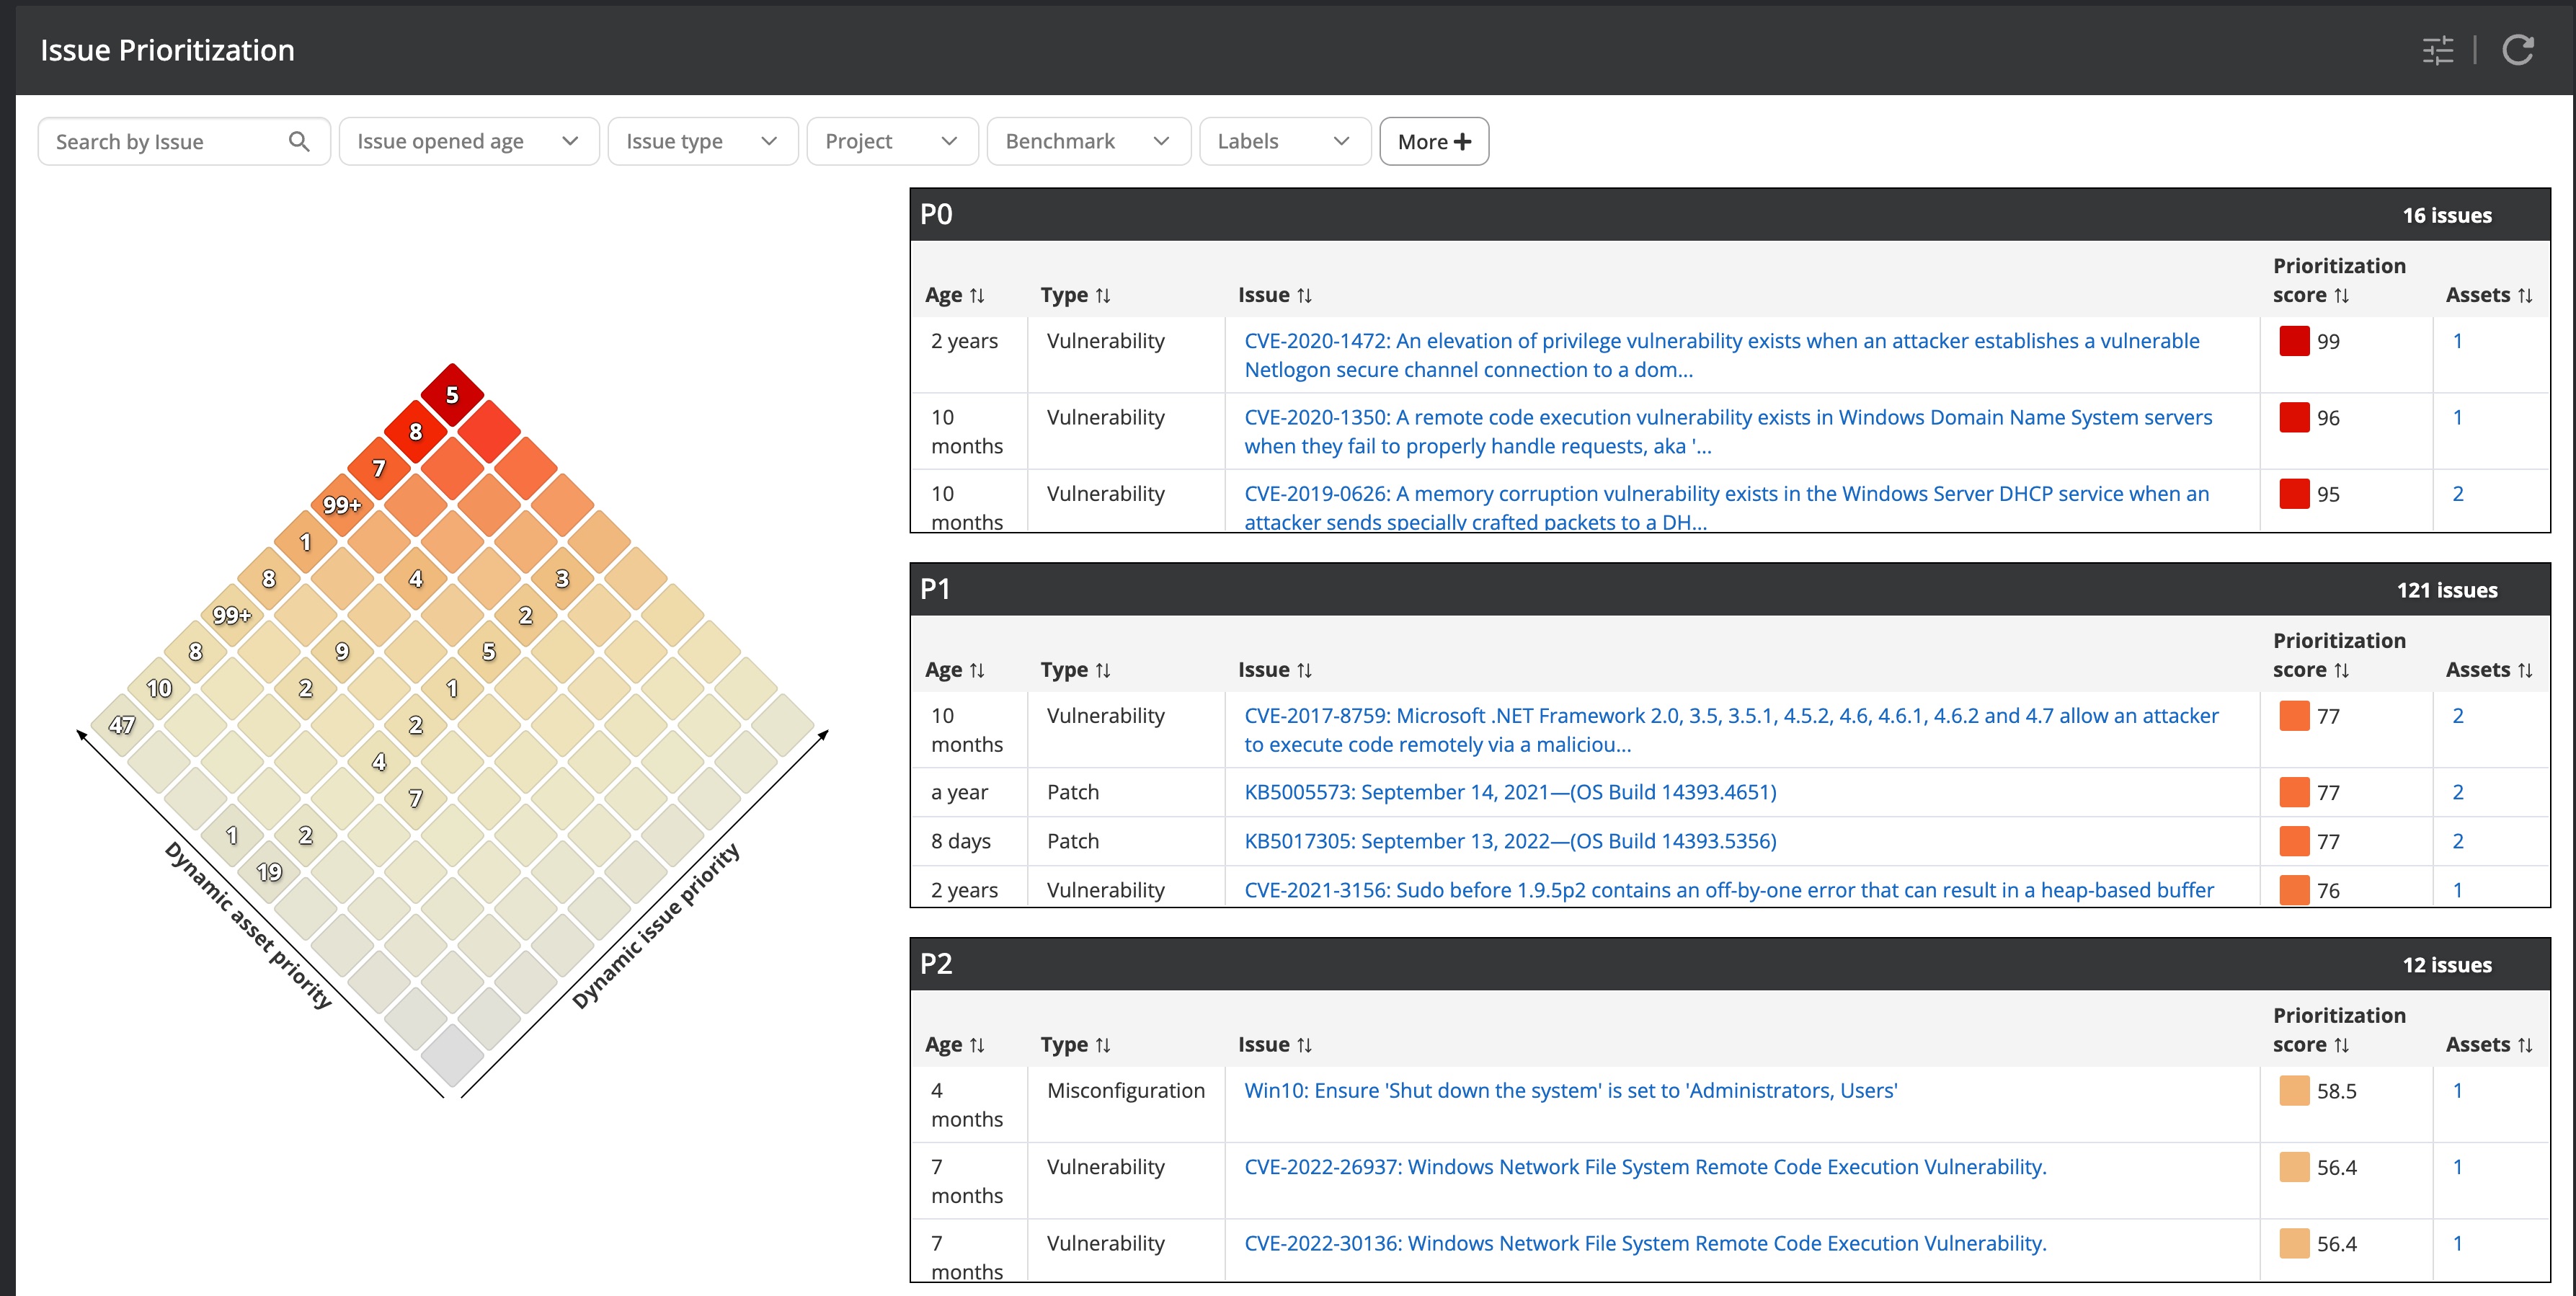
Issues will get prioritized to help you to focus on the right things to address. The most important issues get P0, P1, and P2 prioritization whereas P0 issues should be addressed and resolved immediately, P1 issues within 30 days and P2 issues within 60-90 days.
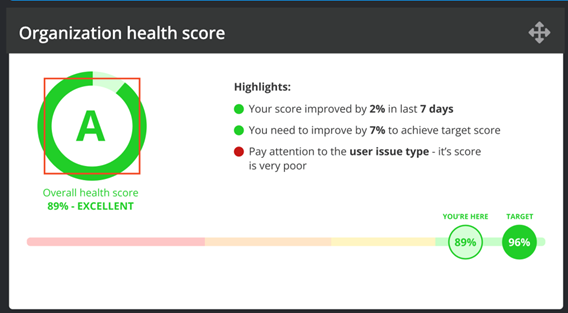
How healthy are you?
Each monitored asset gets a health score. The asset health is calculated for each category (vulnerabilities, configuration, patches, user and software issues) monitored by Nanitor. The overall organization's security health is cumulated from all issues. Nanitor collects all the key metrics for you in the security health dashboard available from the Dashboard menu along with other key metrics that allow you to spot the most impactful issues, the most incompliant software, and the weakest links in your asset fleet and other key metrics.
Check the initial setup
Once the Nanitor Server and the Nanitor collector are deployed and clients are connected (from the collector and installed agents), Nanitor will automatically be populated with data from all connected assets. Nanitor will automatically detect the operating systems on the collected assets and assign them to one of the supported benchmarks. It is important to check the asset list against:
- ensure the assigned benchmark(s) are correct
- any missing assets that you know have agents/collectors installed but do not appear in the list
- ensure that the agents are up to date. If not you can push an update
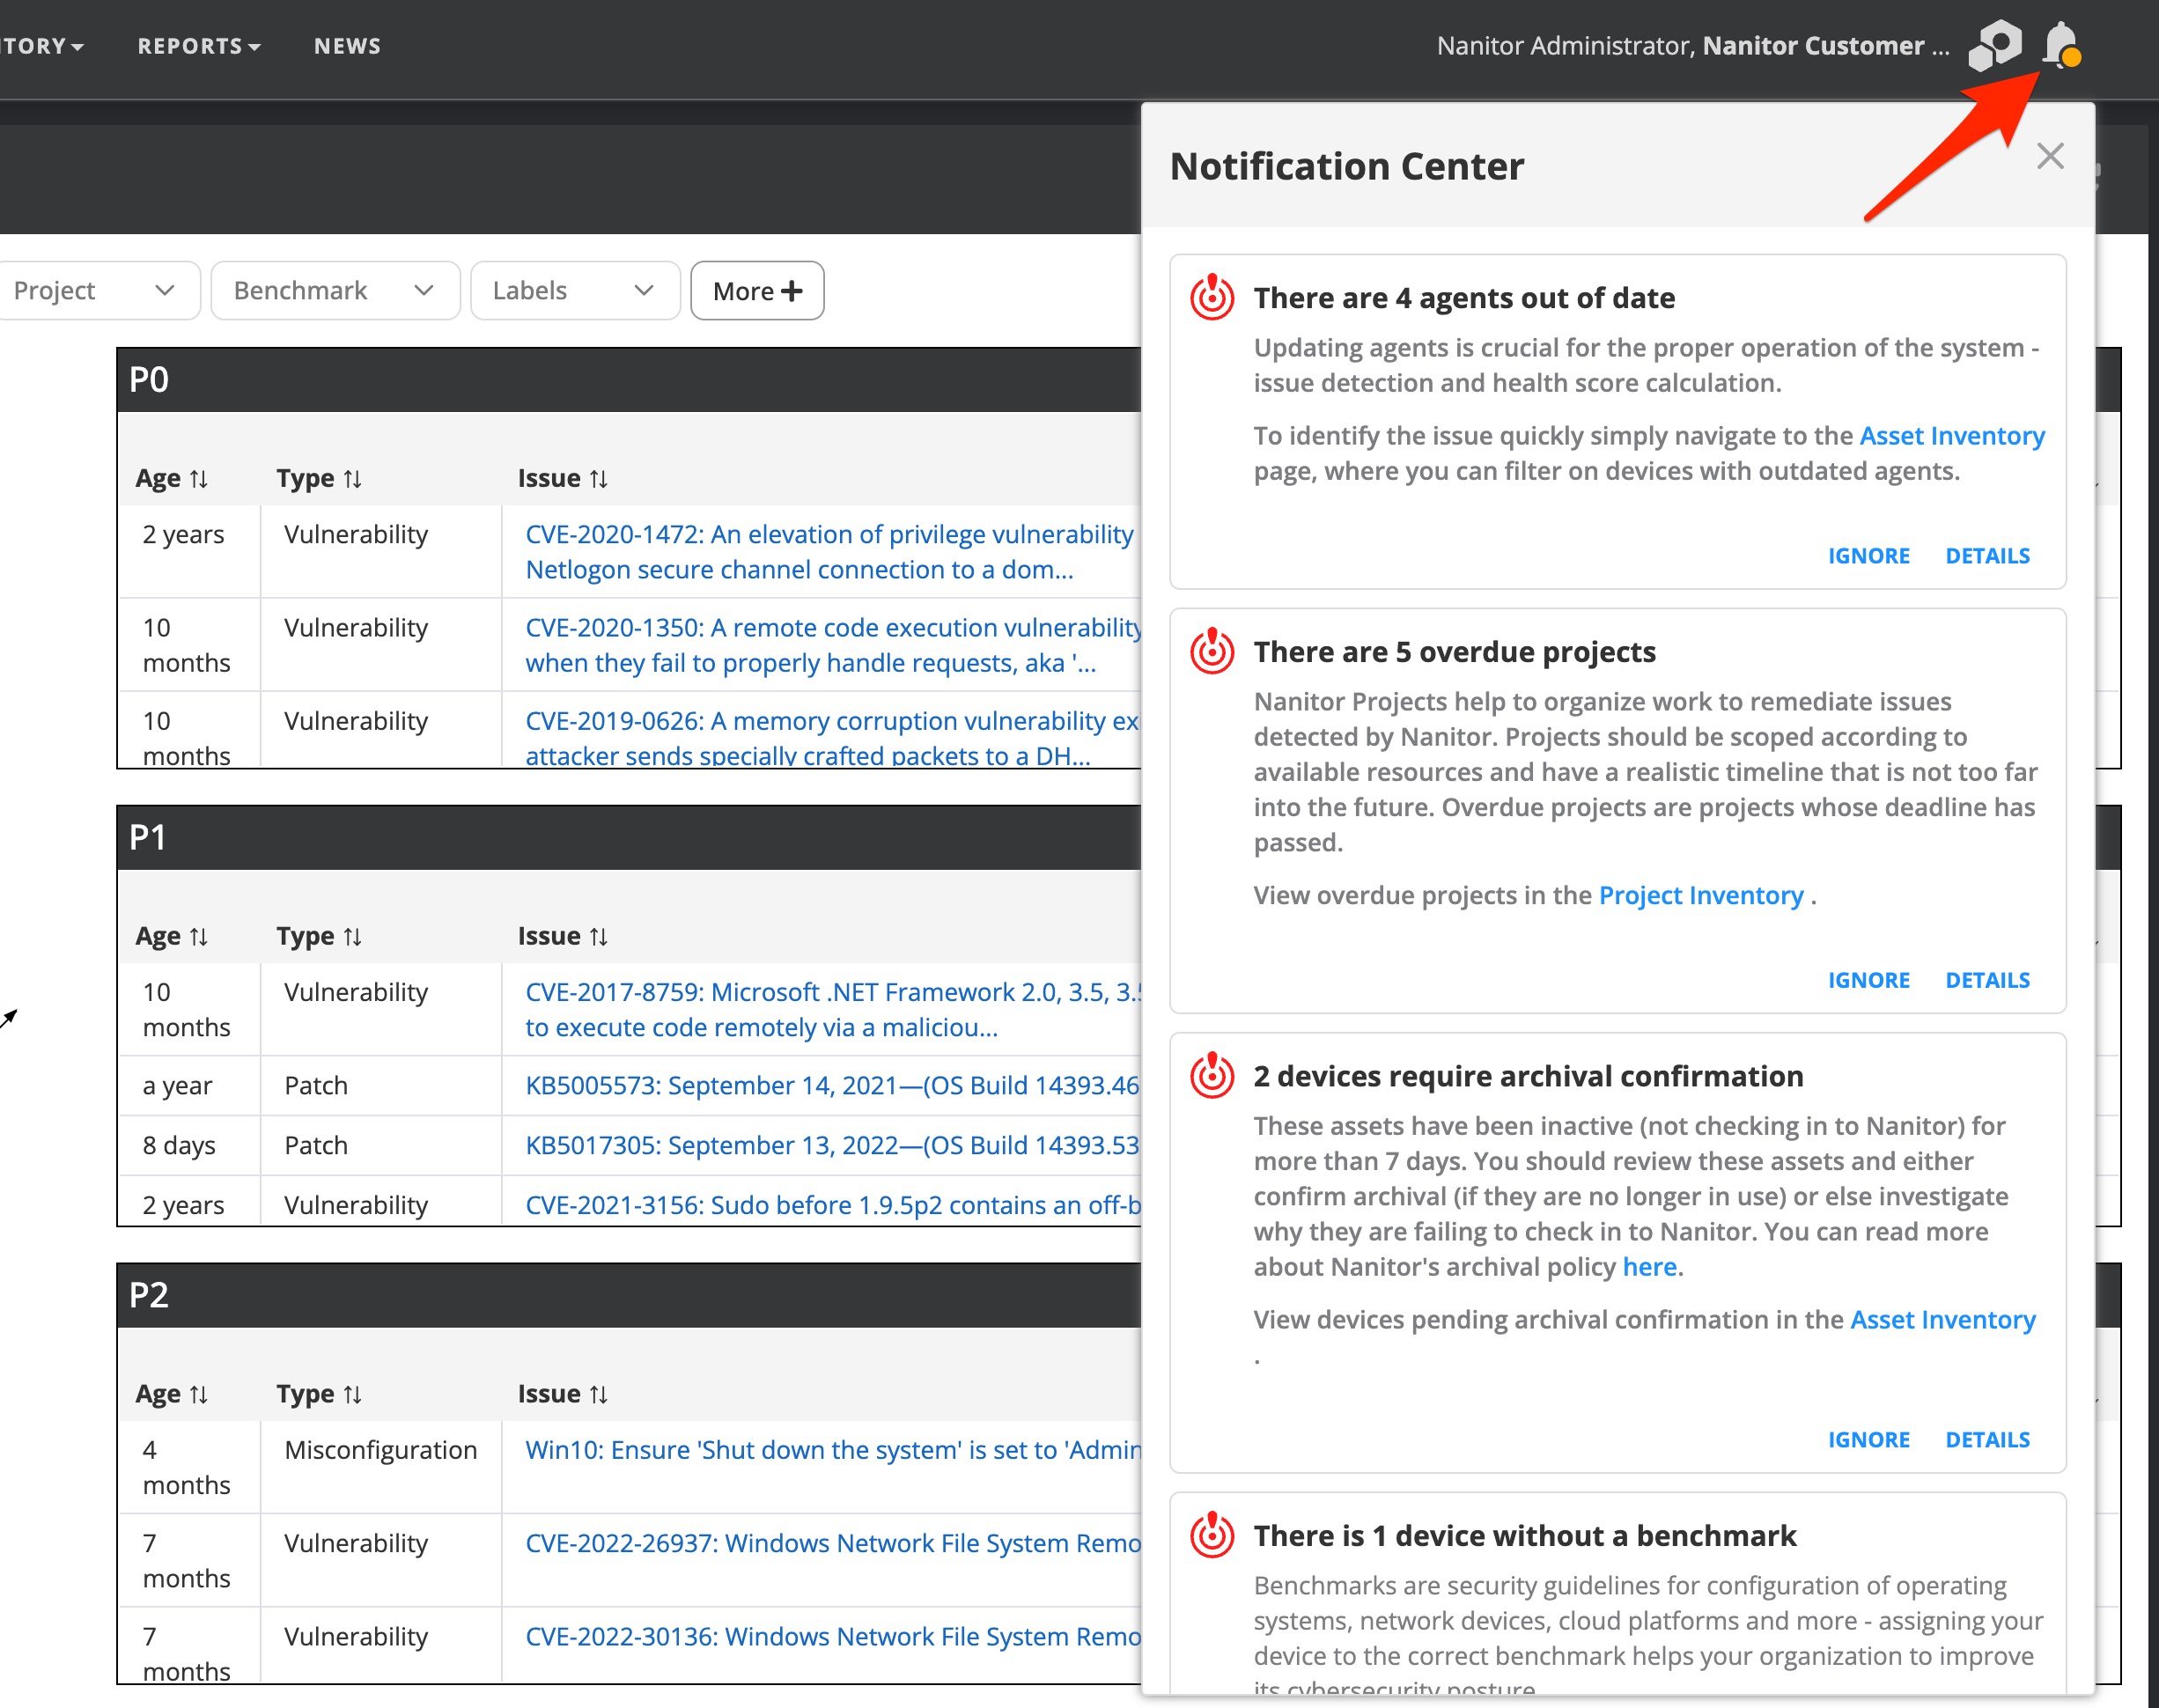
Nanitor will do its best to identify possible problems with your setup and flag them in the notification center. Watch out for any notifications raised by Nanitor and address them accordingly.
Once you see all your assets, Nanitor will capture all gathered issues from the connected assets. Issues in the Nanitor sense are vulnerabilities resulting in misconfigurations, missing patches and software updates, user issues, or open ports.
Invite users from your team
Share the Nanitor experience and insights with your colleagues and among other teams or departments. You can create as many users as needed and divide them into read-only and administrator access. Nanitor will send invitation emails to you that include an activation link.
By default, Nanitor comes with a local user ([email protected]) that cannot be deleted since it acts as a security net when all other login attempts fail. You can manage your users locally by providing them with a username and password. Alternatively, a connection can be established with an LDAP Server or a Microsoft Azure AD with a SAML authentication.
Nanitor supports MFA which is highly recommended.
There is an admin and a guest permission role that can be applied either for local or managed user management. Guest accounts can work with Projects in Nanitor and view all information and reports but can´t make any changes to any configuration settings nor exclude issues from being tracked.
Remediation
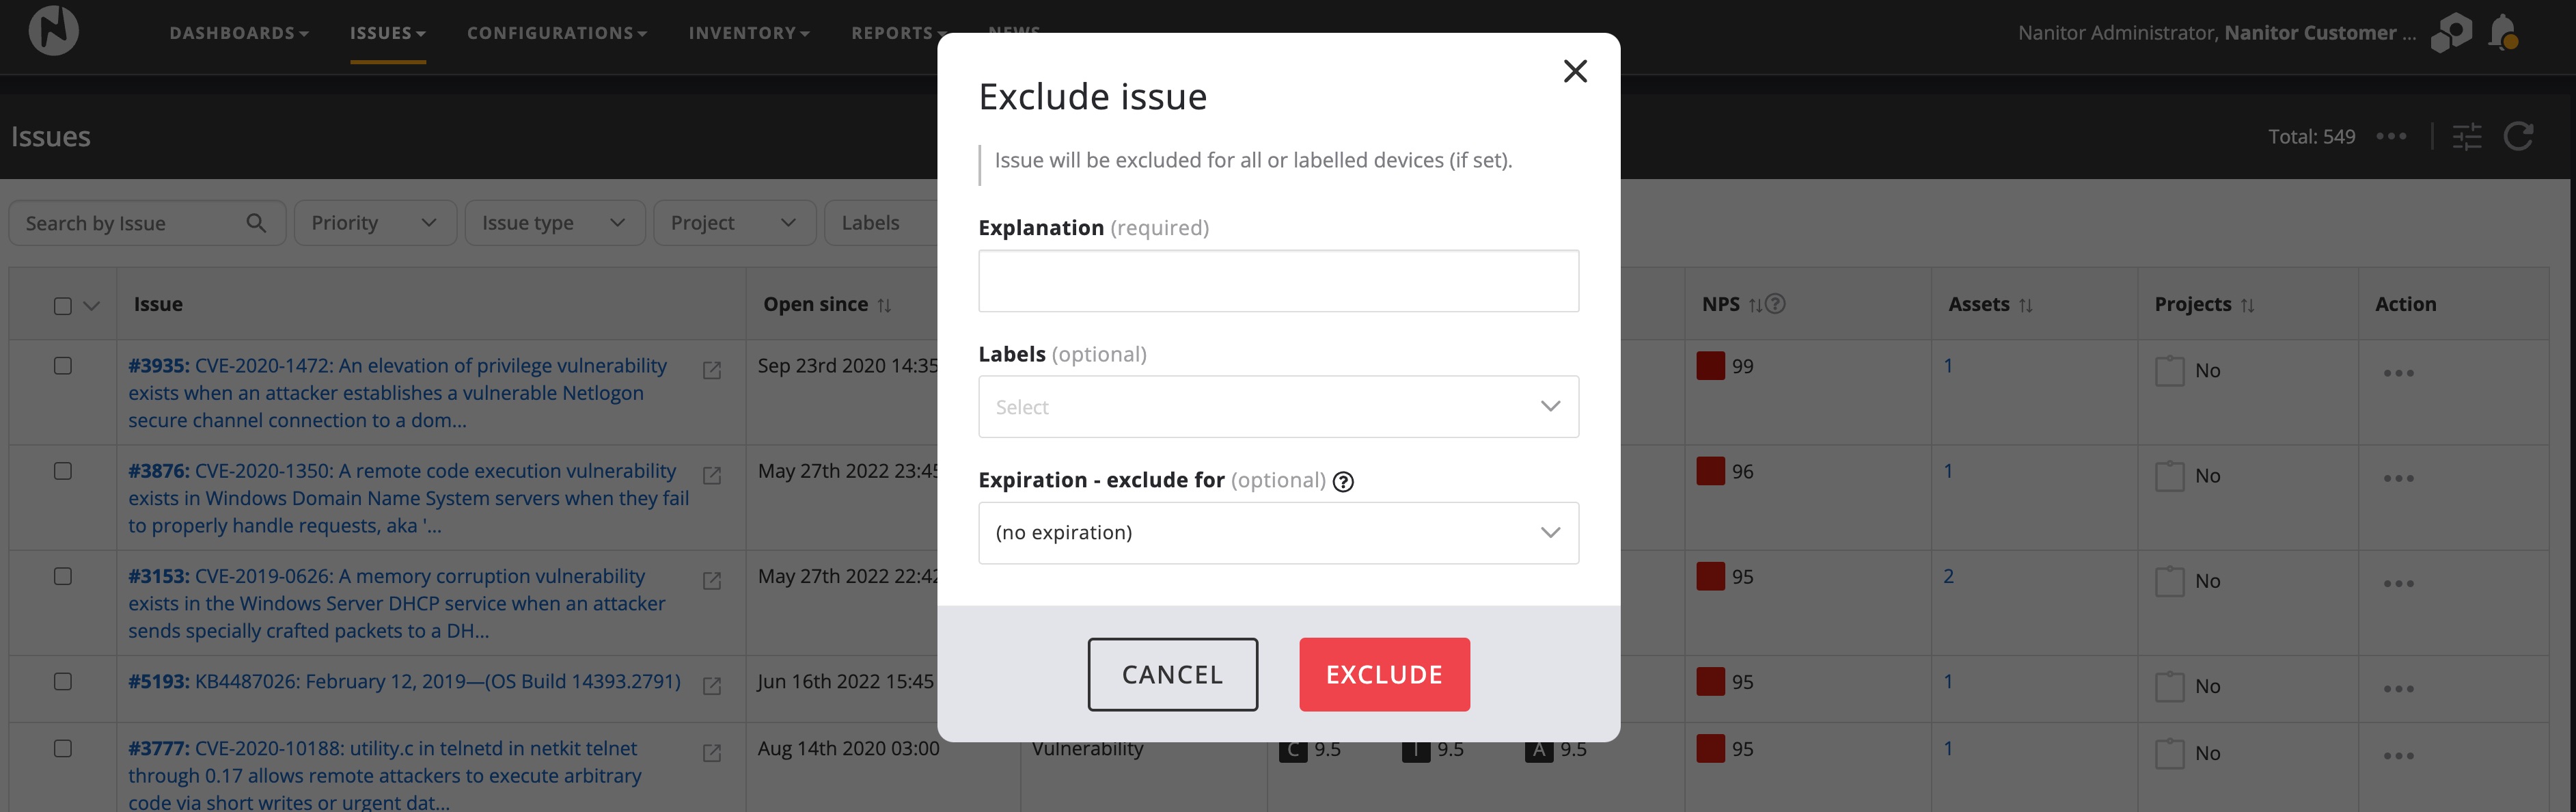
Nanitor detects issues for you and does its very best to provide you with all the information needed for you to do your due diligence on the detected issue. When detected issues are classified as non-applicable either because they are not according to your technical policy or do not apply in your environment you can remove them from your sight by creating an exception.
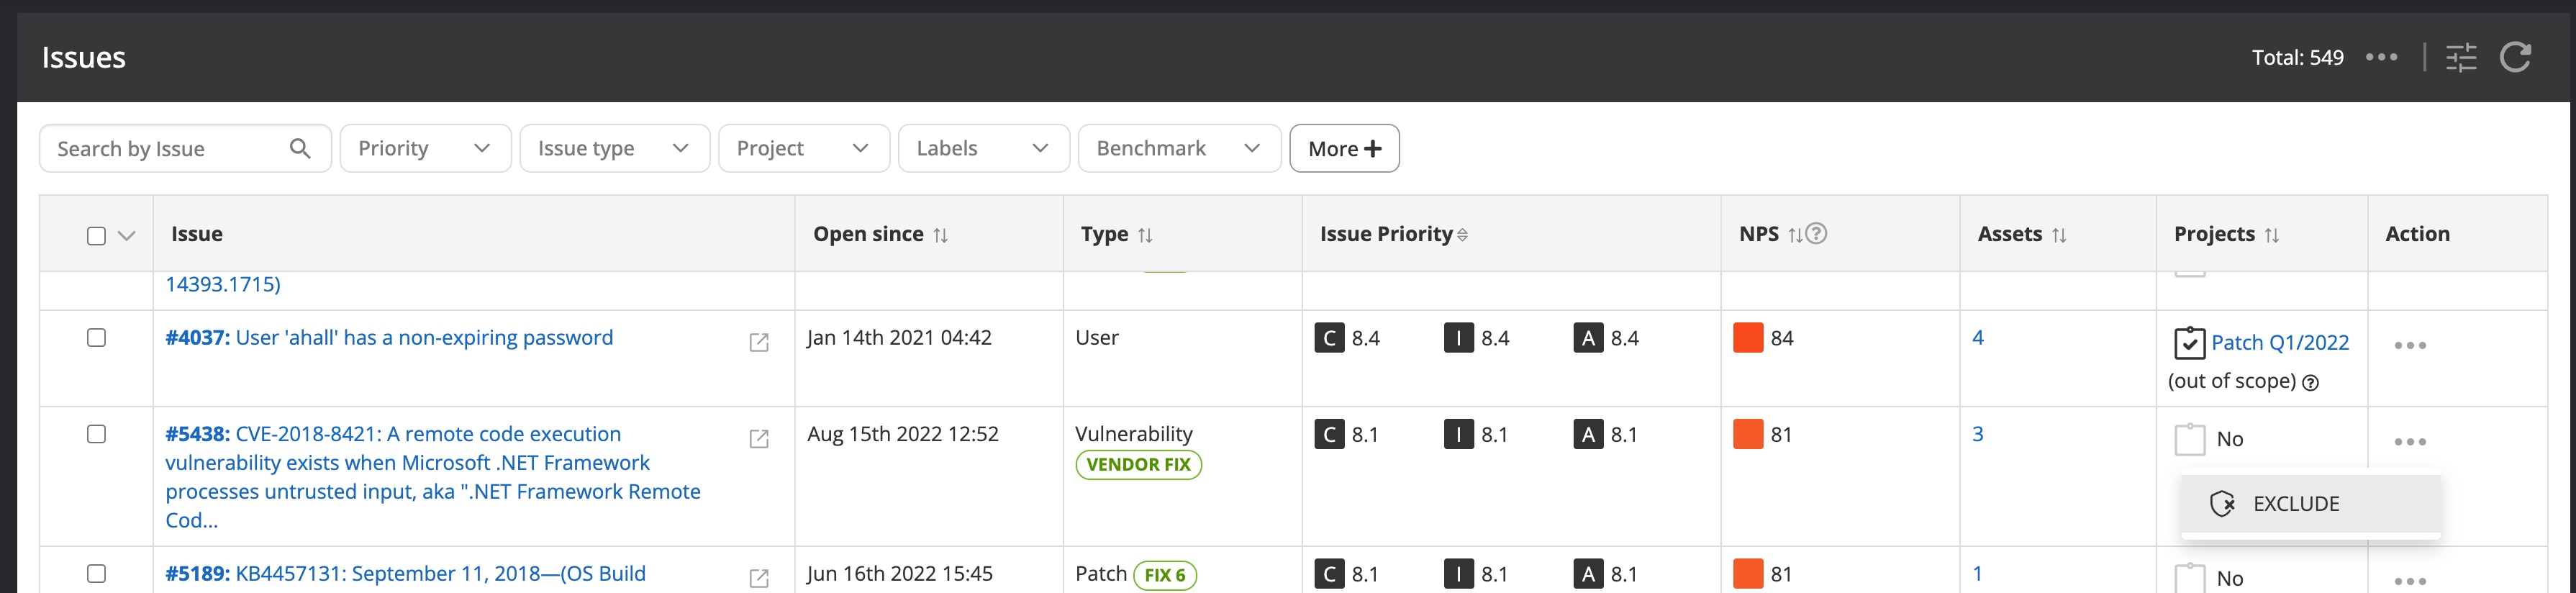
Exceptions can be applied to all assets or be scoped by only applying the exception to a set of labels. Exceptions can be set temporarily by setting a time limit when the exception should be removed or the exception should be removed permanently by not specifying any expiration date. On all exceptions, an explanation (comment) needs to be provided.
For issues that you have agreed to remediate, you should create a remediation project so you can easily track the progress against detected security issues.
Nanitor Projects help you to organize the work that needs to be done to increase the security posture. Nanitor collects information from connected devices, servers, databases, and Cloud infrastructures. Detected misconfigurations, vulnerabilities, missing patches, and software updates are raised as issues in Nanitor where the same issue can exist on multiple assets. The issues are prioritized and make it easy for Nanitor customers to focus on the most important security concerns.
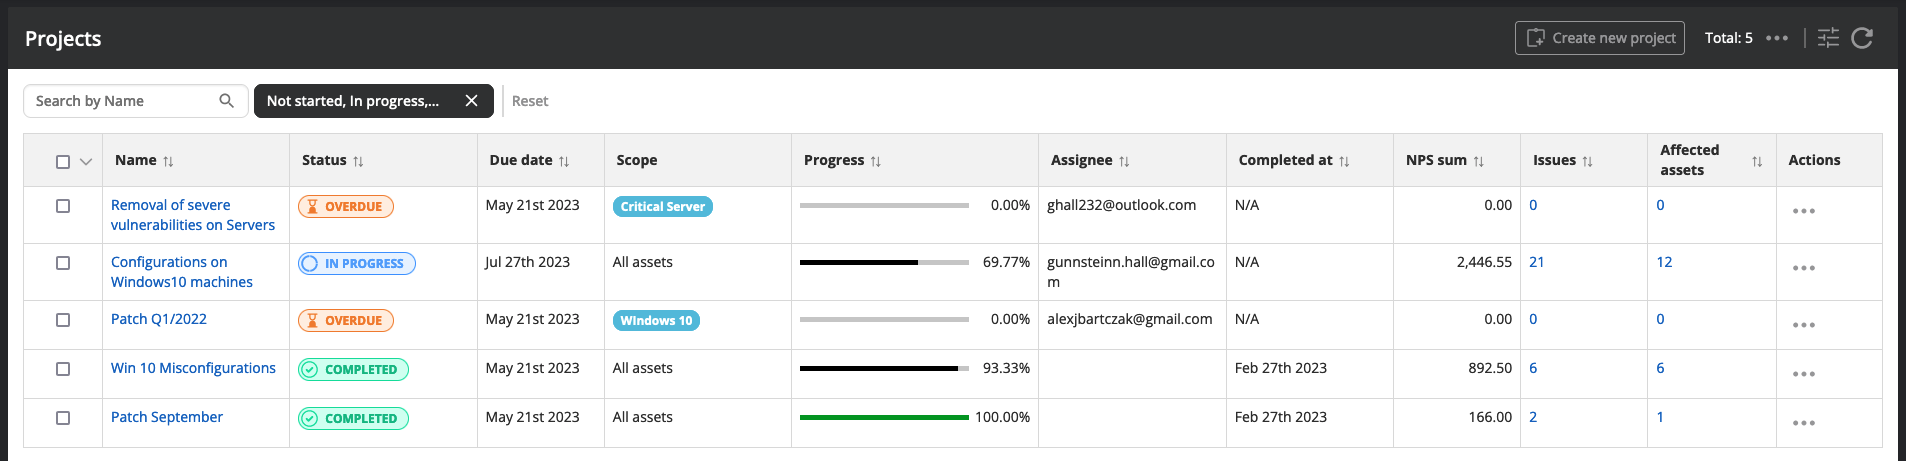
Nanitor Projects help to organize work to reduce collected issues in Nanitor. You can group issues that belong together or have similar remediation and should be worked on in the same context or within the same person or team. Nanitor Projects can be timeboxed and help to define deadlines and or milestones. The progress is automatically calculated by Nanitor.
A complete user guide on how to manage remediation projects in Nanitor is available in the knowledge base.
Where do I start
Nanitor will detect hundreds of identified risks. Thanks to its prioritization engine, Nanitor will display the detected issues in a prioritized way in the diamond. That will help you to focus on the issues that are most important by selecting the ones at the top of the diamond. Nanitor categorizes issues into P0, P1, and P2 priorities with P0 as the most severe priority to act on immediately. Additionally, for issues that are on the top of the diamond, you should look into the overview dashboard to identify:
- the most impactful issues. The amount of assets where an issue is detected has an impact on your security health. The top 5 impactful issues that should be addressed at all times
- the most incompatible software. Nanitor will find vulnerabilities in installed software. The top 3 incompatible software titles should be regularly updated with patches across your fleet
- the weakest links are the assets with the lowest score in your asset inventory. Make sure those assets are rated properly and remediate the issues detected on them or remove the asset completely and replace it with an upgradeable and up-to-date asset.
Nanitor projects are suited to break down the work into chunks that are needed to increase your IT security. A project is a collection of selected issues to remediate detected issues. Nanitor is automatically tracking the progress against any project and considers each violation of an issue on an asset as progress towards the set goal. When working on projects you should consider:
- carefully pick issues in a project. Group together what makes sense to be achieved together (eg. by applying a group policy)
- start small and set a reasonable deadline. Find your rhythm and find the balance of what you can achieve with the resources at hand
- to limit the scope of a detected issue. Remediate on a limited number of assets that matter
- and apply changes to assets to a test set first to identify the possible impact of a change on your assets
Tracking progress
Once you have started the journey towards a more secure IT infrastructure you need to report on the progress made. Both for the upper management but also to ensure that the actions taken have a positive effect on the resiliency of your IT landscape. The progress dashboard (available from the Dashboards -> Progress menu) is suited to identify if your efforts turning in the right direction.
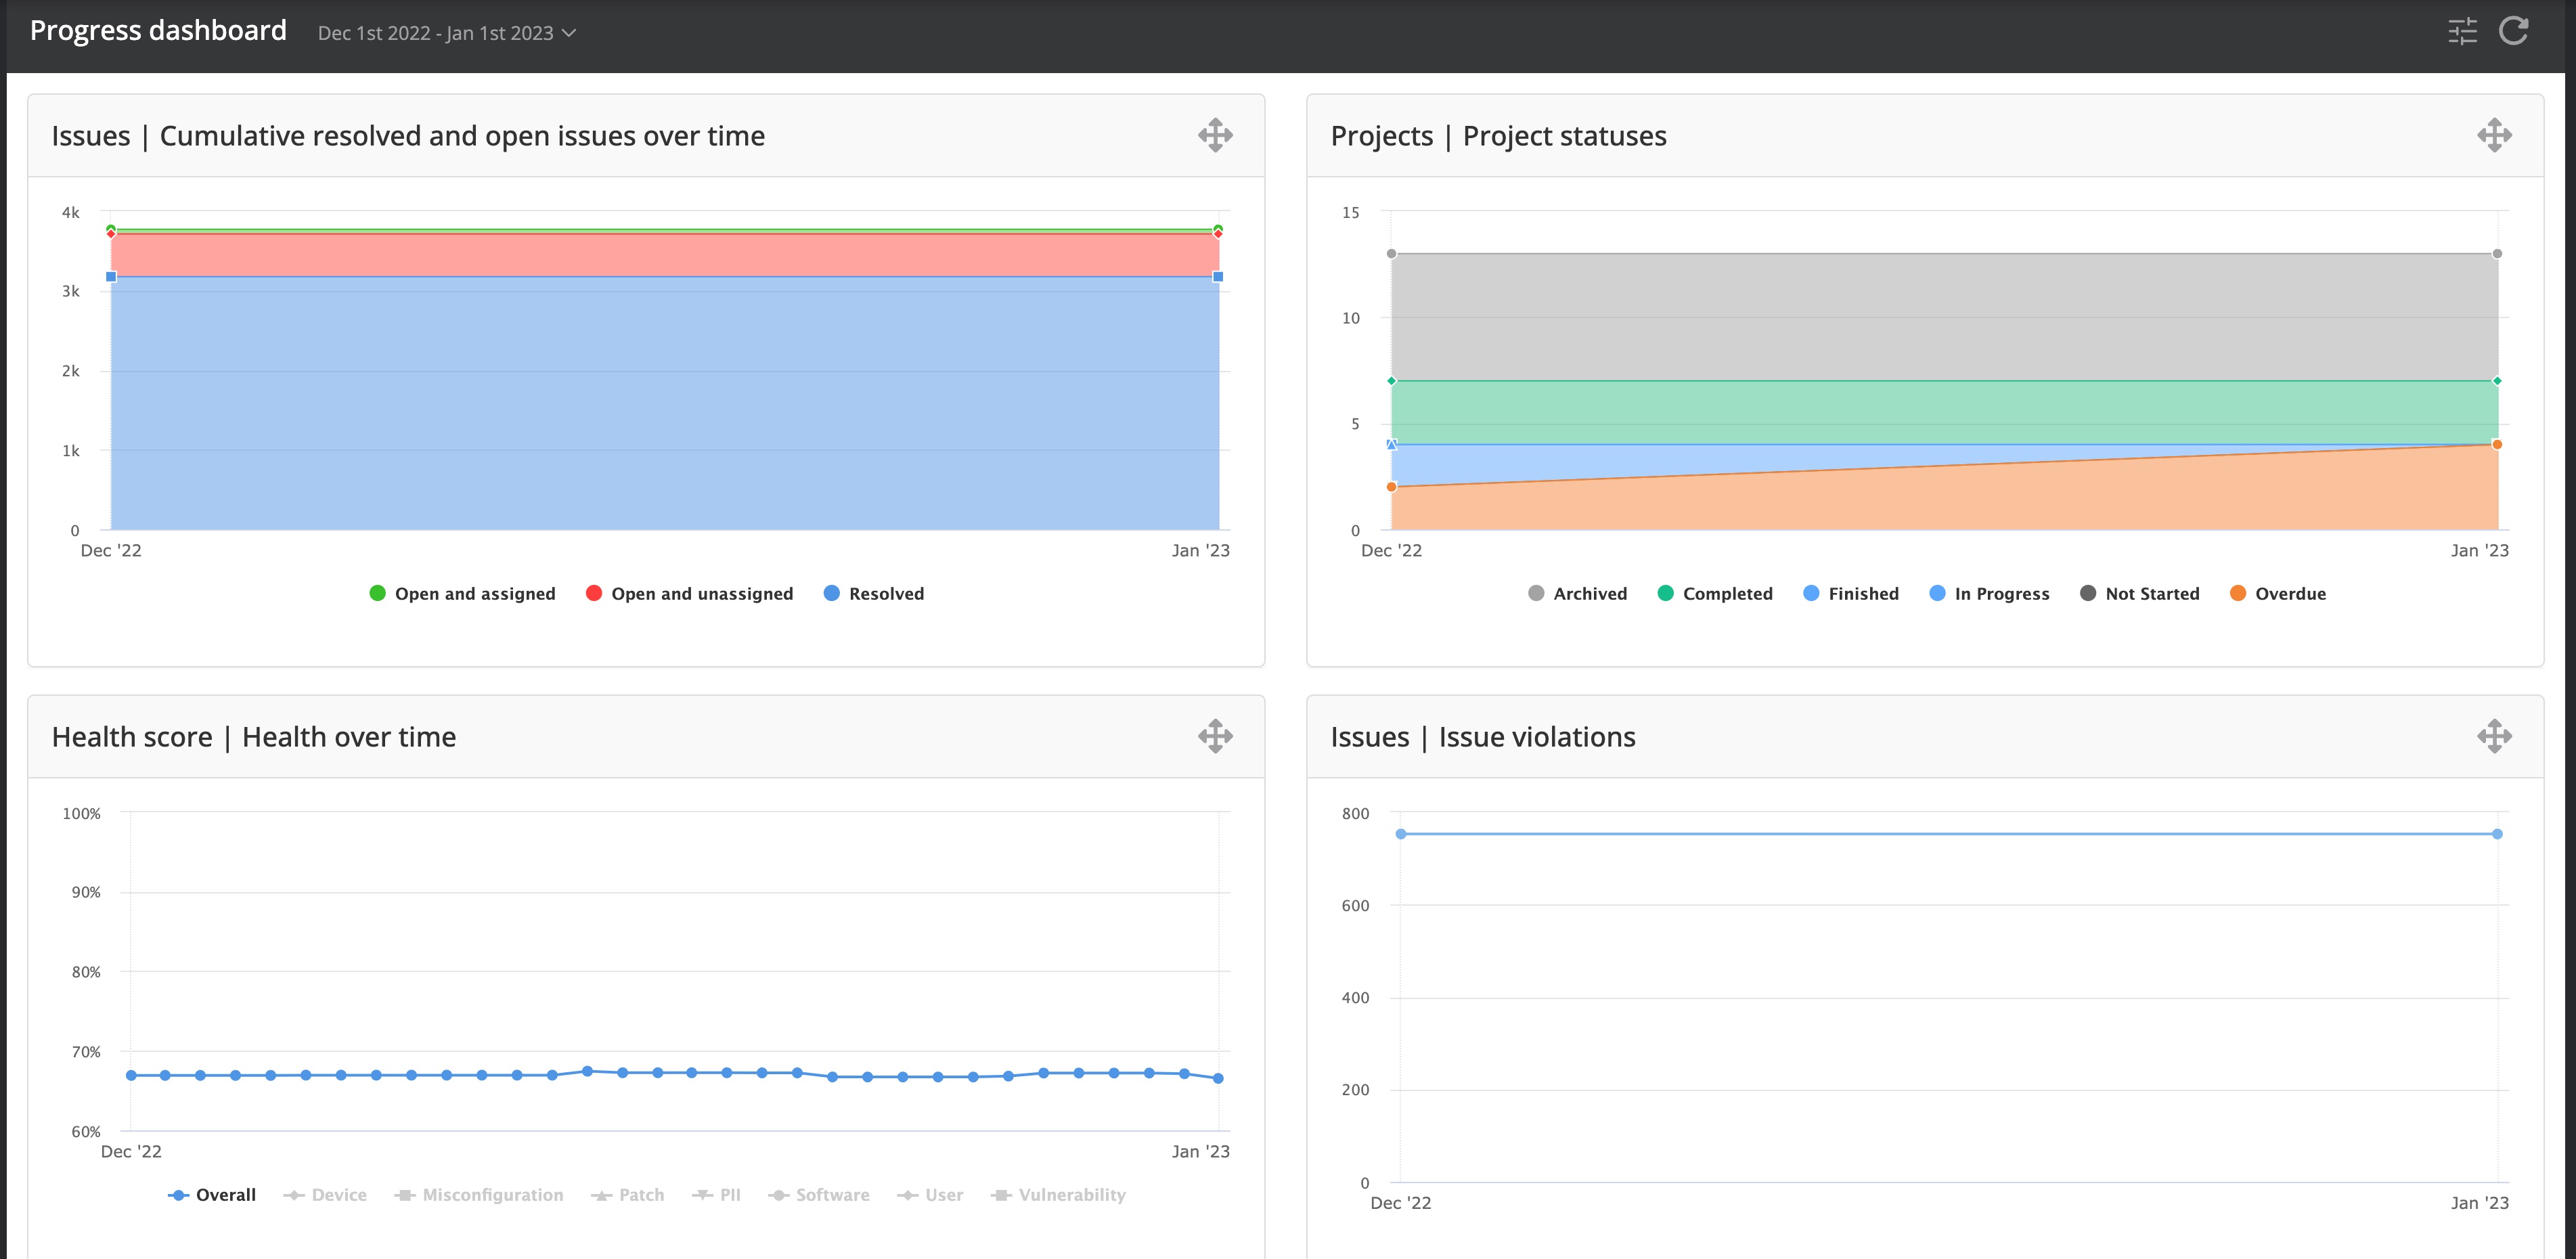
The dashboard shows by default the results from the past year but the date range can be adapted to your needs by selecting a predefined set of date ranges or selecting a custom referral date to compare to.
Setting goals
Besides tracking progress it is important to set an organization-wide goal for better engagement and visibility. The goal is defined in Nanitor as the target health score that should be achieved. The target goal should be adapted according to the current health state and should be increased incrementally. At the end of the remediation activities, the health score should always be beyond the 95% hurdle. That does not necessarily mean to remediate all detected issues by Nanitor but it is necessary to adapt benchmark controls and other configuration settings (eg software and user tracking) according to your technical policies and make exceptions where applicable. This might be a long process spanning multiple months or even years depending on the efforts spent in cyber security.
But you are not done once you reached your target goal. There is continuous work to watch newly detected vulnerabilities, possible user access breaches, or newly onboarded assets that are insecure because they are shipped with the default configuration settings. You need also to watch out that all your assets are reporting back to Nanitor by ensuring that the communication between the asset and Nanitor is undisrupted. Additionally highering the bar is recommended to increase IT security even further. This can be done by defining a software policy, enabling stricter network scanning, or increasing the scaling factor on detected vulnerabilities according to the organization's priority.